
You’ve probably heard of overclocking your system components like your RAM, GPU, and CPU. Perhaps you’ve even had a chance to try it out, to varying degrees of success. But what exactly is overclocking, and how does it affect the components of your computer system? And furthermore, how should one go about doing so without causing too much trouble for the lifespan of their computer systems?
How Does Overclocking Work?
Simply put, overclocking is pushing your hardware past its stated limits for the purpose of improving performance. By doing this, computer system owners can experience faster and more detailed game and graphics performance than is possible at the base settings of their system components.
There are three primary components involved with overclocking your computer system, and how each one affects the overall performance thereof:
GPU
Similar to overclocking your monitor display, overclocking your GPU allows for the computer system to render graphics faster than normal. This can have useful benefits such as the number of frames that can be rendered per second (commonly known as fps) in addition to the amount of detail that the computer can render in terms of in-game objects and their image textures.
- ALSO READ: Best Gaming Graphics Cards Under $400
CPU
Whereas the GPU is responsible for the visual output, it is the CPU that is effectively the “brains” of the job. Thus, overclocking the CPU allows the entire computer system to work quicker and faster than normal.
- YOU MAY ALSO LIKE: Best CPU Under $300
RAM
In terms of overclocking, your system RAM is often the path of least resistance. Because RAM overclocking makes it quicker and faster to access the long-term cache that the RAM is used for (that is to say that the information currently in the RAM is considered by the computer system to be needed later on, so that it doesn’t have to go to your system storage to get the information it needs) so this is useful if you really need to crunch the numbers for those profit calculations.
Of course, this can also boost framerates in games with heavy RAM and CPU access (CS:GO comes to mind here).

- RELATED READING: Best RGB RAM
Overclocking and System Component Lifespan
It should be noted that since overclocking pushes the limits of your computer system beyond what is normally rated. The components for which you have set overclocking preferences will be working at a higher level than they expect to be, and the added heat can cause additional wear on their parts, thereby affecting how long they may last.
You’re probably going to need a serious cooling setup if you’re going to be serious about overclocking your system components, and in most cases, the cooling system provided in the box (if there’s one in there at all these days) is not going to be enough for more than a very small adjustment. Liquid cooling is suggested for this, preferably an all-in-one that’s ready to go from the start.
That’s because it’s so much more efficient in managing heat than an air-cooled setup, in which if you’re really overclocking the CPU can push temperatures to 86°C and above, at which point you not only have to be nuts but you’re also degrading the lifespan of the CPU at an alarming rate.
Even more alarming is the voltage you set: you crank that up too far (read: anything above 1.4V) and you could literally cook the chip, resulting in a bricked computer system.
And if that’s not enough, you might even throw your computer into the crash zone as the operating system can easily go nuts over any sort of imbalance, such that instability and blue screen errors are easily encountered on a frequent, repetitive basis if you’re not careful.
You’re also going to want to make sure that you have ample power going into the system components – a 550W power supply is a bare minimum for any kind of serious overclock job.

How to Overclock Without Causing Excessive Damage
First off, you should be sure to check that your components are accepting of overclocking, as not all of them are. In addition to this, a manufacturer will sometimes add an overclock at the factory which makes further overclocking a risky proposition. Other than that, it’s best to start small and work upward.
In the case of overclocking your system components, you have an even wider range of issues to be aware of, as the method you use could cause even worse problems and have unintended results which may make getting back to operational mode difficult (if not impossible).
And if you’re doing software-controlled overclocking (where the settings are controlled by an app installed on your computer system) your only recourse for getting things back to normal is often to start your computer in safe mode, uninstall the control app, reinstall and set things back to your last successful overclock (or even the hardware defaults, if necessary).
Note also that you may find that there are situations where you might wish to use your overclocking app for the reverse effect. For instance, if you want to have a configuration that hinders game performance yet comes to the benefit of business apps (spreadsheets, word processing etc.) And it’s also tricky to approach overclocking on a notebook system because of the already-tight working space for these components (so in these cases it’s advisable not to even bother unless it’s for the opposite effect).
The downside of course is that some overclocking procedures (RAM for instance) are not going to work out if you’re using the app-based approach, so in these cases, you’re going to have to go into your BIOS configuration to do the job.
For this reason, there will be camera snapshots instead of direct screenshots as a latter option is not possible here. Also, the configuration procedures are system-specific and may vary between different computer models, whether you have AMD or Intel for your processor, or even if you flash a BIOS update.
Anyway, there are several settings that you may find related to overclocking. We’ll start with the RAM frequency which on my home system is configured using the DRAM frequency option and selecting the next highest setting from what has been detected:

Note also that the BIOS is set to expert configuration mode, which provides access to several advanced features that may also benefit the performance of your system, but which may come at additional risk. For example, the CPU core voltage options in the BIOS setup have three choices: the default automatic detection, an override mode, and an offset mode.

The offset mode mark can then be set to either plus or minus, as shown here:

As a side note, the override mode wasn’t supported in the system configuration so this option was locked to Auto.
The BIOS options in this scenario also offer a function that tests multiple memory overclock configurations to see what sticks (if anything):

In addition to this is the option to set the number of times the system will attempt to use a given memory configuration (with a default of five tries).
The overclocking options in the BIOS configuration used for this guide also include four advanced control options for the CPU, which control the precision overdrive, core performance, downcore and cTDP limit.
Downcore can be two, three, four, or six although these are based on the number of cores that are available. That is to say, the number of cores that you wish to use can be manually controlled in any one of the listed patterns. In this case, two can be either 1+1 or 2+0 and three is 3+0, four can be 3+2 instead of 4+0, while six is 9+3:

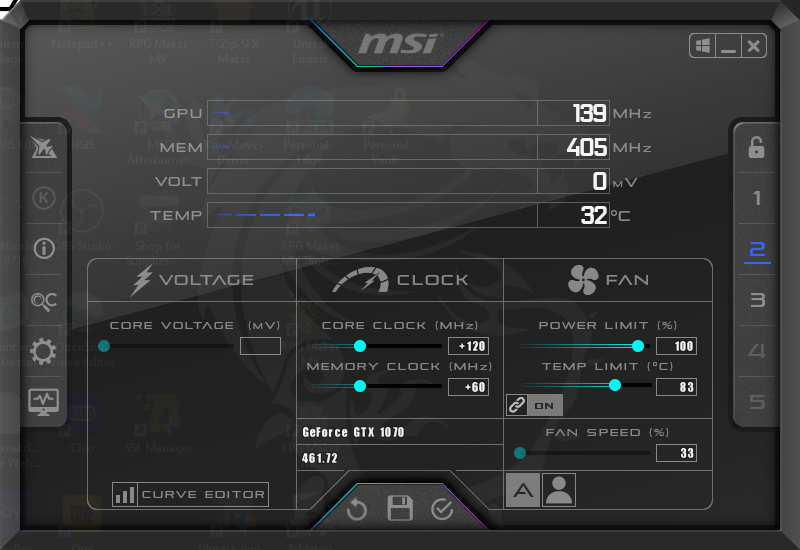
Overclocking the GPU is an entirely separate matter, though. As there is no mechanism for accessing configuration directly on the GPU this portion will be done using an app installed on the computer system. For this, we’ll focus on Afterburner, which is a free download from computer parts company MSI.
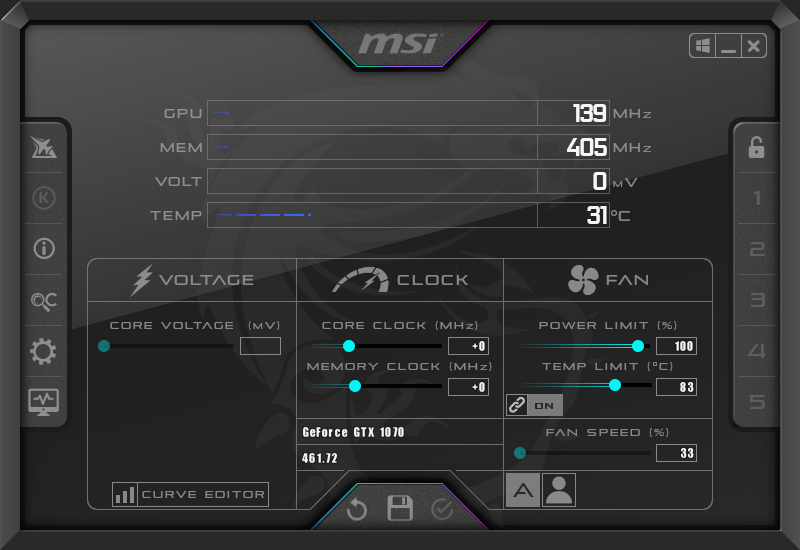
The interface for Afterburner is rather straightforward; the GPU and MEM lines show the active speed of the associated components (in MHz), VOLT shows the current-voltage adjustment and TEMP shows how hot (or cold) your system is running.
On the bottom are quick adjustments that you can make: Voltage allows you to adjust the core voltage and its curve level, clock allows for the adjustment of the core clock and memory clock (in addition to displaying what type of GPU you have), and fan allows you to adjust the power and temperature limits of the GPU while also adjusting the fan speed.
The windowpane next to the minimize and close functions triggers startup configuration at system boot, however, this is risky as you may have to set things back to defaults if you have problems. The good news is that Afterburner does include a failsafe that may save you from having to uninstall the app just to start over; if you hold Ctrl on your keyboard during system startup, Afterburner will not load its previous configuration.
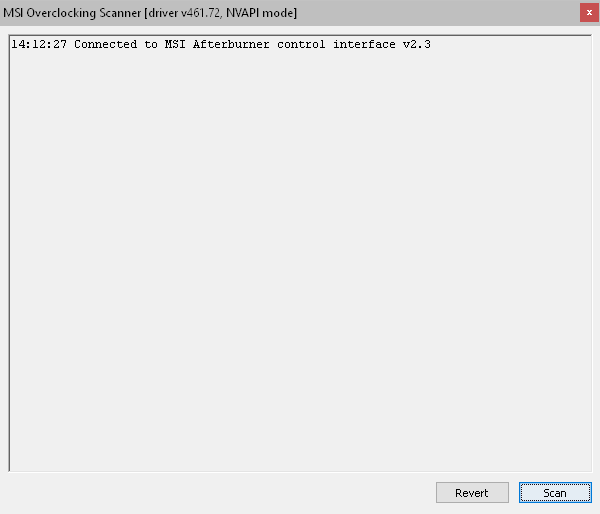
Also, in case you’re not sure as to how much your system can handle there’s an automated settings scanner that will scan for stability issues with varying load levels:

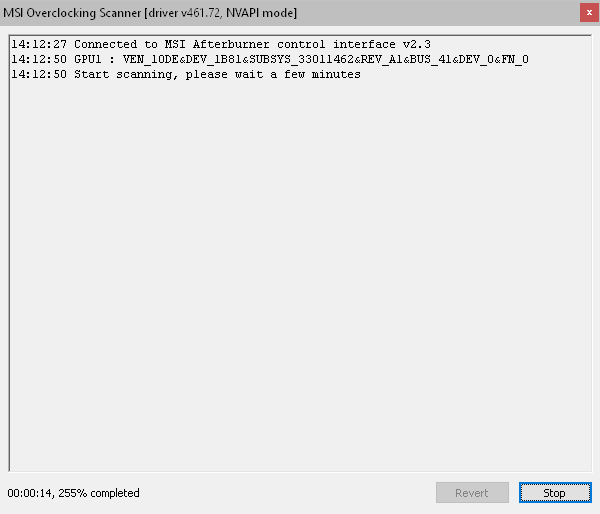
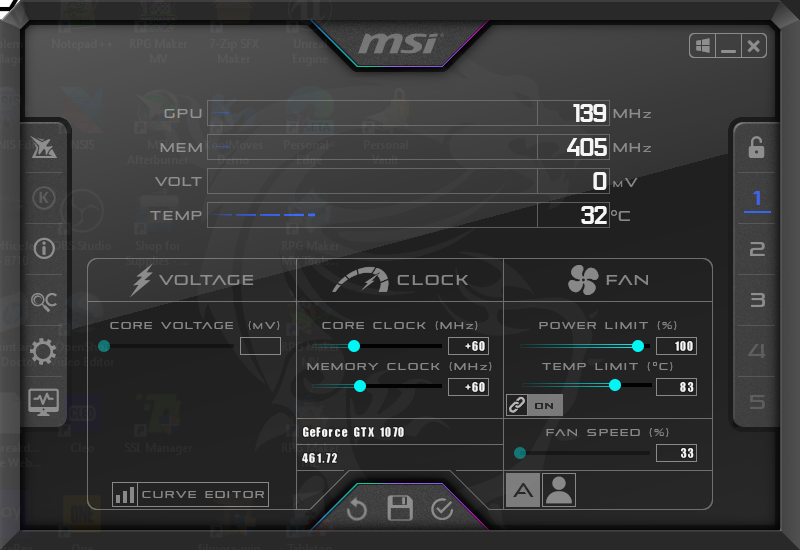
Unfortunately, the automated tool didn’t work in this case, so the initial overclock was added manually, setting both the GPU and its RAM to an additional 60 MHz, like so:
After this, it was time for a quick comparison. For this the 3D Mark performance tests were run using the Time Spy demo:

And the results for the initial overclock are as follows:

By comparison, the stock settings yielded the following result:

Now here’s where it gets tricky, as in past practice the prospect of pushing the hardware in question to extremes of 200 MHz or so didn’t work on the test system. For this reason, the settings were pushed to 75% of that number (150 MHz each).
Unfortunately, the second graphics test was marred by visual imbalance (the display was completely white with black spots) so the memory clock was reduced back to 60 MHz. However, 150 MHz on the GPU clock also proved to be too much (as the demo crashed partway through) so this was adjusted down to 120MHz.
After that, the Time Spy results were as follows:

Oddly, the configurations had lower scores on the highest of the two sets of overclocked settings, however, the results do show a noticeable boost in the GPU performance so it’s not like there was much difference all the way around.
Next, to check the performance which may apply to older games the Fire Strike demo was run on its base settings with the following results, starting with the stock settings:

Followed by the original 60 MHz overclock:

This time the scores show a much more noticeable difference as Fire Strike doesn’t test the CPU separately, with the higher numbers corresponding to better overall performance. So to compensate and score more accurately, Time Spy was run again – this time without the CPU test so that the focus would be entirely on the graphics performance starting with stock settings:

Followed by the 60 MHz overclock:

And finally with the 120 MHz overclock:

With the focus entirely on the graphics, we get a much clearer analysis of how much the overclocking changed the relevant performance metrics. As with Fire Strike, the higher overclock numbers yield better results for the graphics, offsetting the combined observations from the earlier tests.
Note that the 120 MHz overclock did not finish the Fire Strike demo (as it was canceled out by an unspecified error during the test), so this has not been included.
However, to close things out a run of Fire Strike Extreme was loaded with the following base result:

And we bring our testing phase to an end with the 60 MHz overclock:

Should you overclock your system components?
Perhaps the best answer to this is how far you’re willing to go and if you have the capacity to do so without pushing your components into the danger zone. You should also consider overclocking only if you have the ventilation, cooling, and general room space to allow for any added heat to dissipate without issue.
But if you’re running tight on any of these or are otherwise not adequately prepared, then the benefits of overclocking may not be worth the risks.
Be the first to comment