
You’ve probably heard of overclocking your system components like your RAM, GPU, and CPU. Perhaps you’ve even had a chance to try it out, to varying degrees of success.
But there’s one thing that you may not have heard about in terms of overclocking: your monitor display. Yes, the part of your system setup that you’re reading this on. The question, though, is if it’s actually worth the trouble and potential risk factors to actually do so.
What is Monitor Overclocking?
Simply put, overclocking is pushing your hardware past its stated limits for the purpose of improving performance. In the case of monitor overclocking, you’re pushing the refresh rate higher than what is specified.
What makes this important is how fast the visuals are rendered per second, so if you have a 60Hz monitor at base settings the display will be updated 60 times per second. To put that into perspective, this was written on a gaming laptop that has a 144Hz refresh rate for its display so the visuals are updated 144 times per second.
As you can probably guess, the higher number is better than the lower one.
- YOU MAY ALSO LIKE: Fastest Gaming Monitors
Pros
Probably the most obvious benefit is visual fidelity. As specified previously, higher rates are better so if you’re trying to shoot down an opposing player before you get sniped then you’ll have a better chance of being prepared if you can see it coming quickly, and the higher refresh rate will give you a heads up faster than the lower one.
In addition, if you’re experiencing “screen tear” (that is to say, portions of one frame are being jumbled in with another one) or if there’s serious visual jank such as chopped and/or jarred images, then overclocking may help bring the visuals into sync with each other.
Cons
On the other hand, you may have reasons not to proceed with overclocking. The most obvious of these is the simple fact that not every monitor is going to play nice with overclocking or even provide the option at all.
Similarly, overclocking can’t be easily applied at higher resolutions (so if you’re gaming in 4K then you have less of an option for overclocking than you would at 1080p).
Beyond that, your warranty won’t cover overclocking (and in fact may not cover much of anything after the fact). And in other cases, the overclocking process may do more harm than good, which brings us to the next question:
- RELATED ARTICLE: Best Monitors for a Triple Monitor Setup
Can Overclocking Damage Your Monitor?
The unfortunate answer is yes. If you push things too far, or if there’s already an overclock from previous adjustments (or even the factory, which is also possible) then you’re asking for trouble with the integrity of your monitor display.
Additionally, the heat load from overclocking is higher than at normal, rated specifications which can also cause damage issues if there’s not enough ventilation in the room to support the increase in temperatures. And on a related note:
Does Overclocking Reduce the Lifespan of Your Monitor?
This, too, is an unfortunate yes.
Again, as the clock speed goes up so does the heat which if not accounted for in the environment or the hardware itself can severely wear down the parts within your monitor leading to premature failures.
And again, overclocking is generally not covered by warranty terms so if your equipment fails because of the overclocking process then you’re most likely going to be straight out of luck with the manufacturer.
- READ ALSO: Cheapest 240hz Gaming Monitors
The Best Way to Overclock Your Monitor
There are two major components to the overclocking process: the monitor itself and the settings on your computer.
The order in which you do this is important: if you raise the refresh rate on your computer system before you adjust the monitor refresh rate, you’ll probably end up with a jumbled mess.
The important thing here of course is to read the documentation on your monitor: the controls will be different even if they’re from the same source, so one HP model is not going to be the same as another (to give an example).
Also, it’s important to start small rather than go for a significant shift right away, just in case you run into problems. (On a side note, some gaming-oriented monitors may have an additional boost applied at the factory, so you might not get any added benefit – and in fact, may be taking a big risk – from overclocking these panels yourself.)
Once that’s done you can adjust the settings on your computer without much trouble. NVIDIA and AMD both have solutions for this in their settings apps, but you might not want to do that if you want a consistent interface for maintaining your display settings.
For that, we’ll use an app called CRU (as in Custom Resolution Utility). Download the app (which is in a ZIP package), extract its contents, and launch the CRU.exe app file.
Next, select your display from the drop menu at the top, and click on the Add option in the Detailed Resolutions list. Set the timing to the Automatic option for your display type (HDTV or PC, case depending) and then specify the desired refresh rate. Click OK, close CRU, and restart your computer.
Now you can select the custom resolution from Windows Settings. If successful, save the changes and you’re good. But if you end up with a jumbled mess or a blank screen, it’s most likely that you overdid it; if this happens just give your computer about 10-20 seconds to roll back the changes.
Finally, you can test the performance changes by using the frame skipping test page at TestUFO. (Be sure to use a Chromium-based app such as Edge or Chrome for this test or it might not work properly.) You should see the refresh rate of your display listed as shown in the following example:
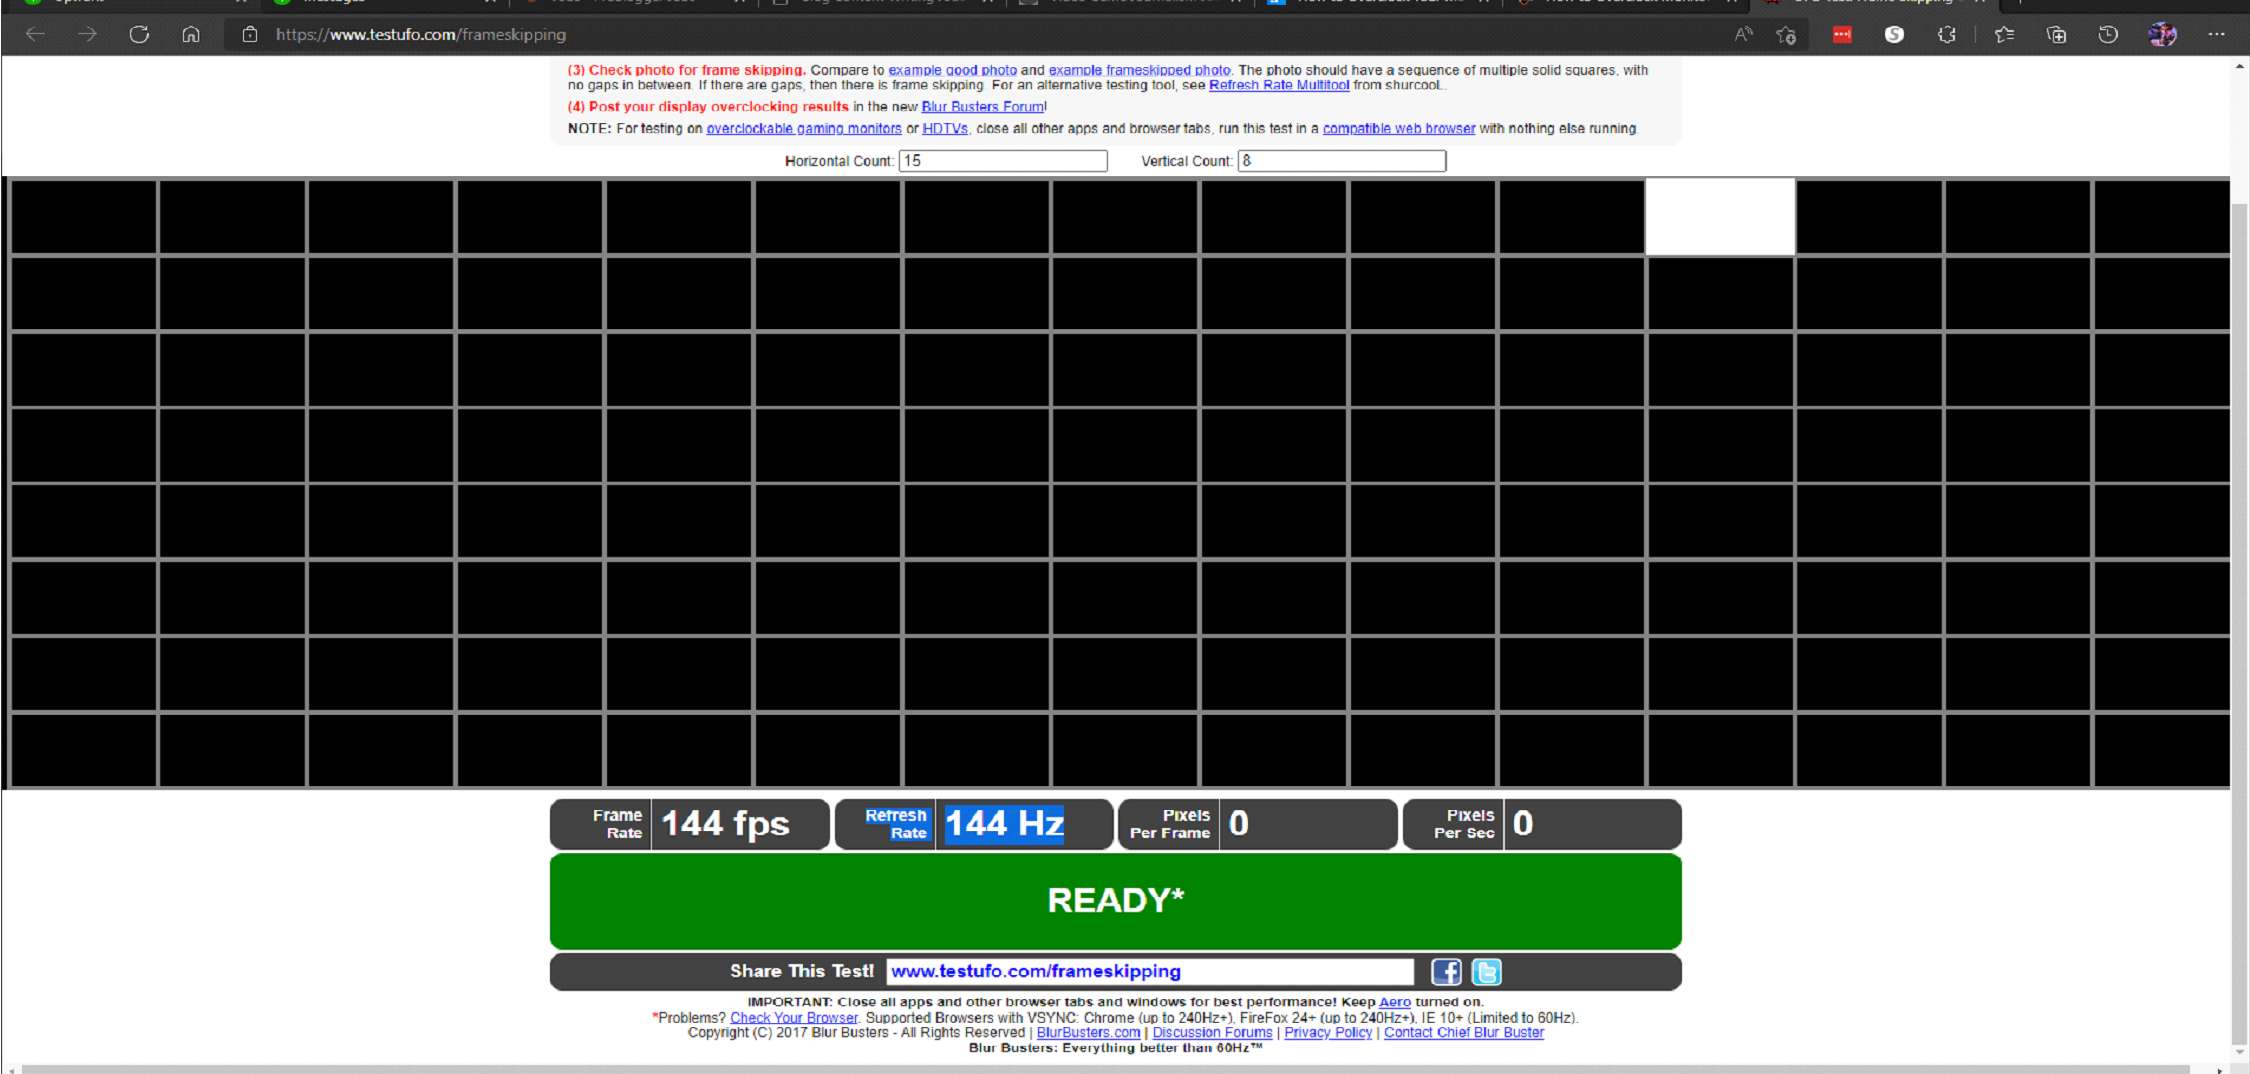
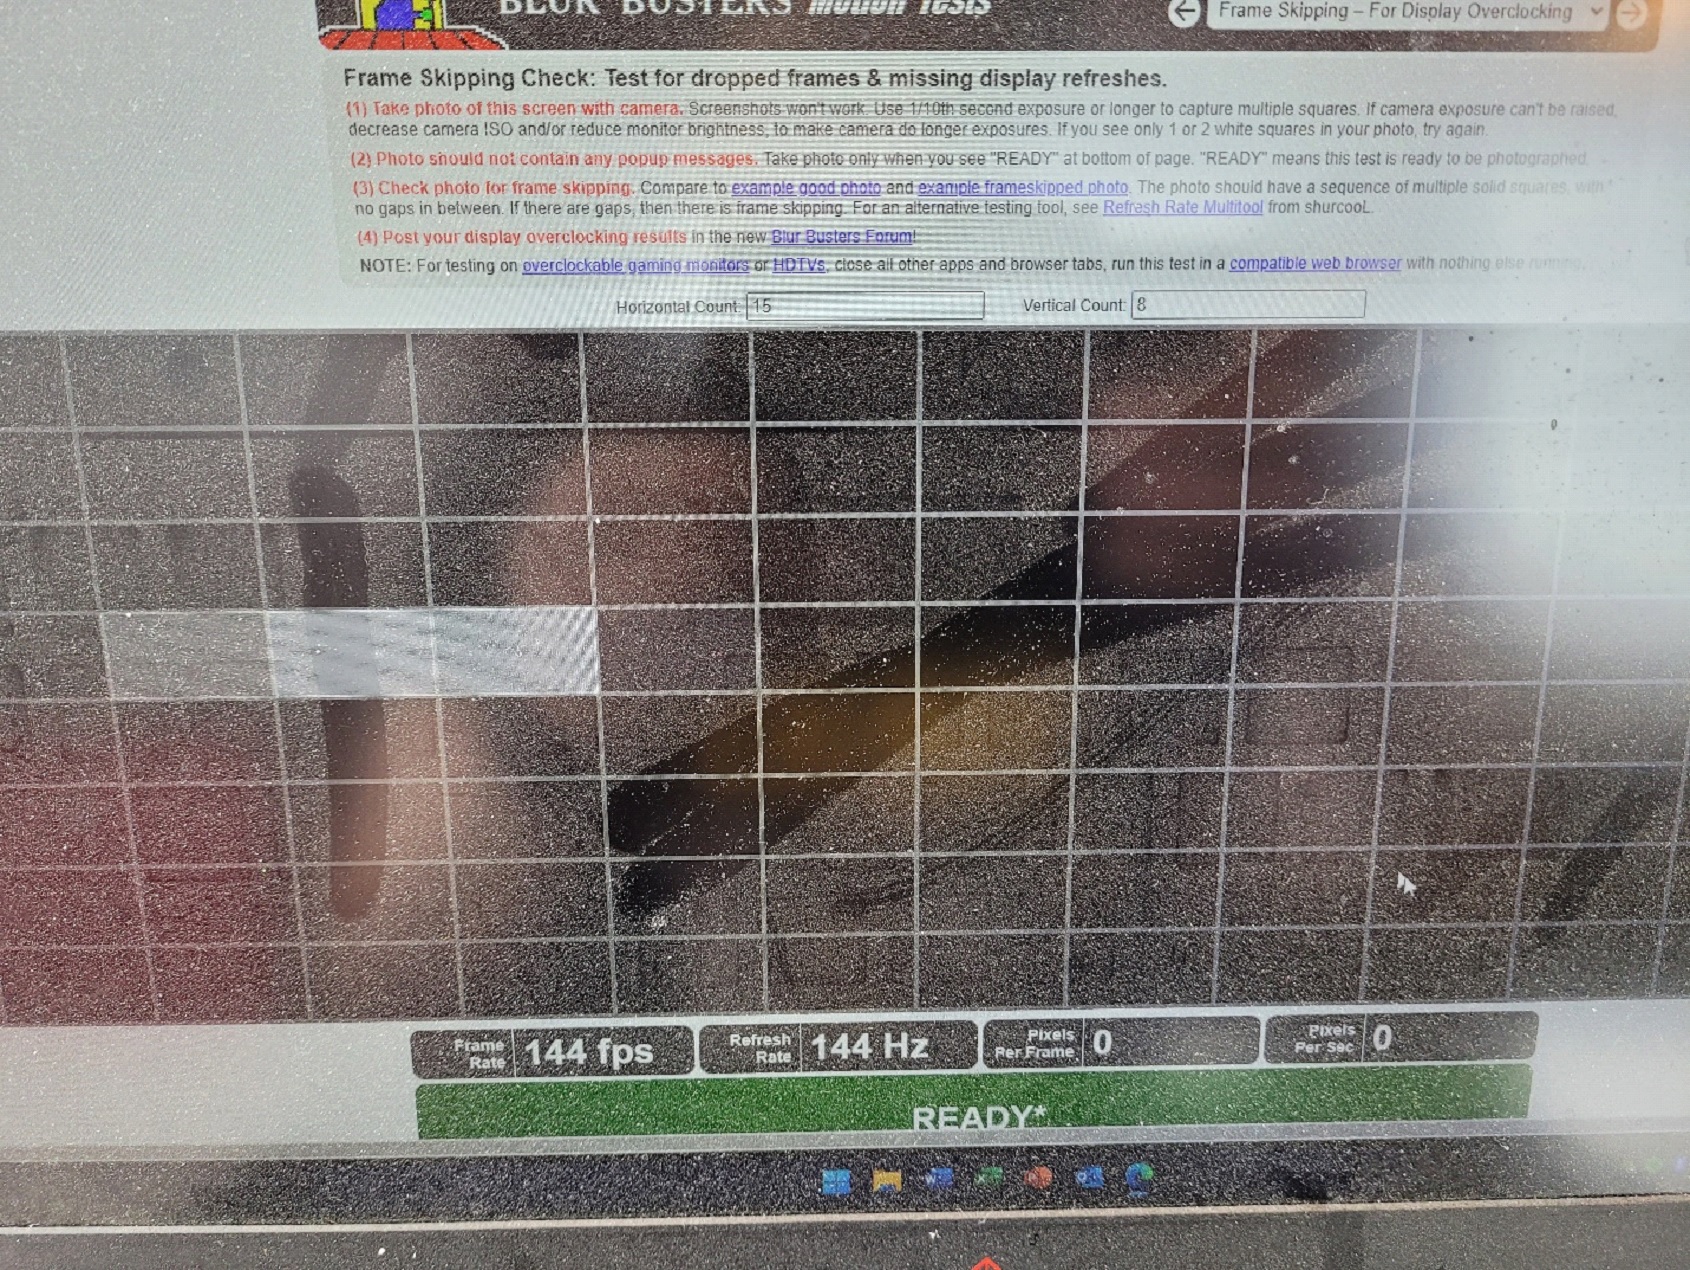
As an added bonus, if you take a picture of the screen with your phone or a camera while the ready message is displayed, you can check the picture to see if the highlighted squares are connected to each other.
- YOU MAY ALSO LIKE: Best White Gaming Monitors
If for any reason there is a gap between any of the highlighted squares, you have a problem with your setup. In the case of the system that was used for this test, there’s nothing between the three highlighted squares so everything is going to plan.
Note that CRU isn’t effective for all hardware configurations (and especially if you have integrated graphics), in which case you’ll have to make the changes in the app that is provided for your graphics settings function.
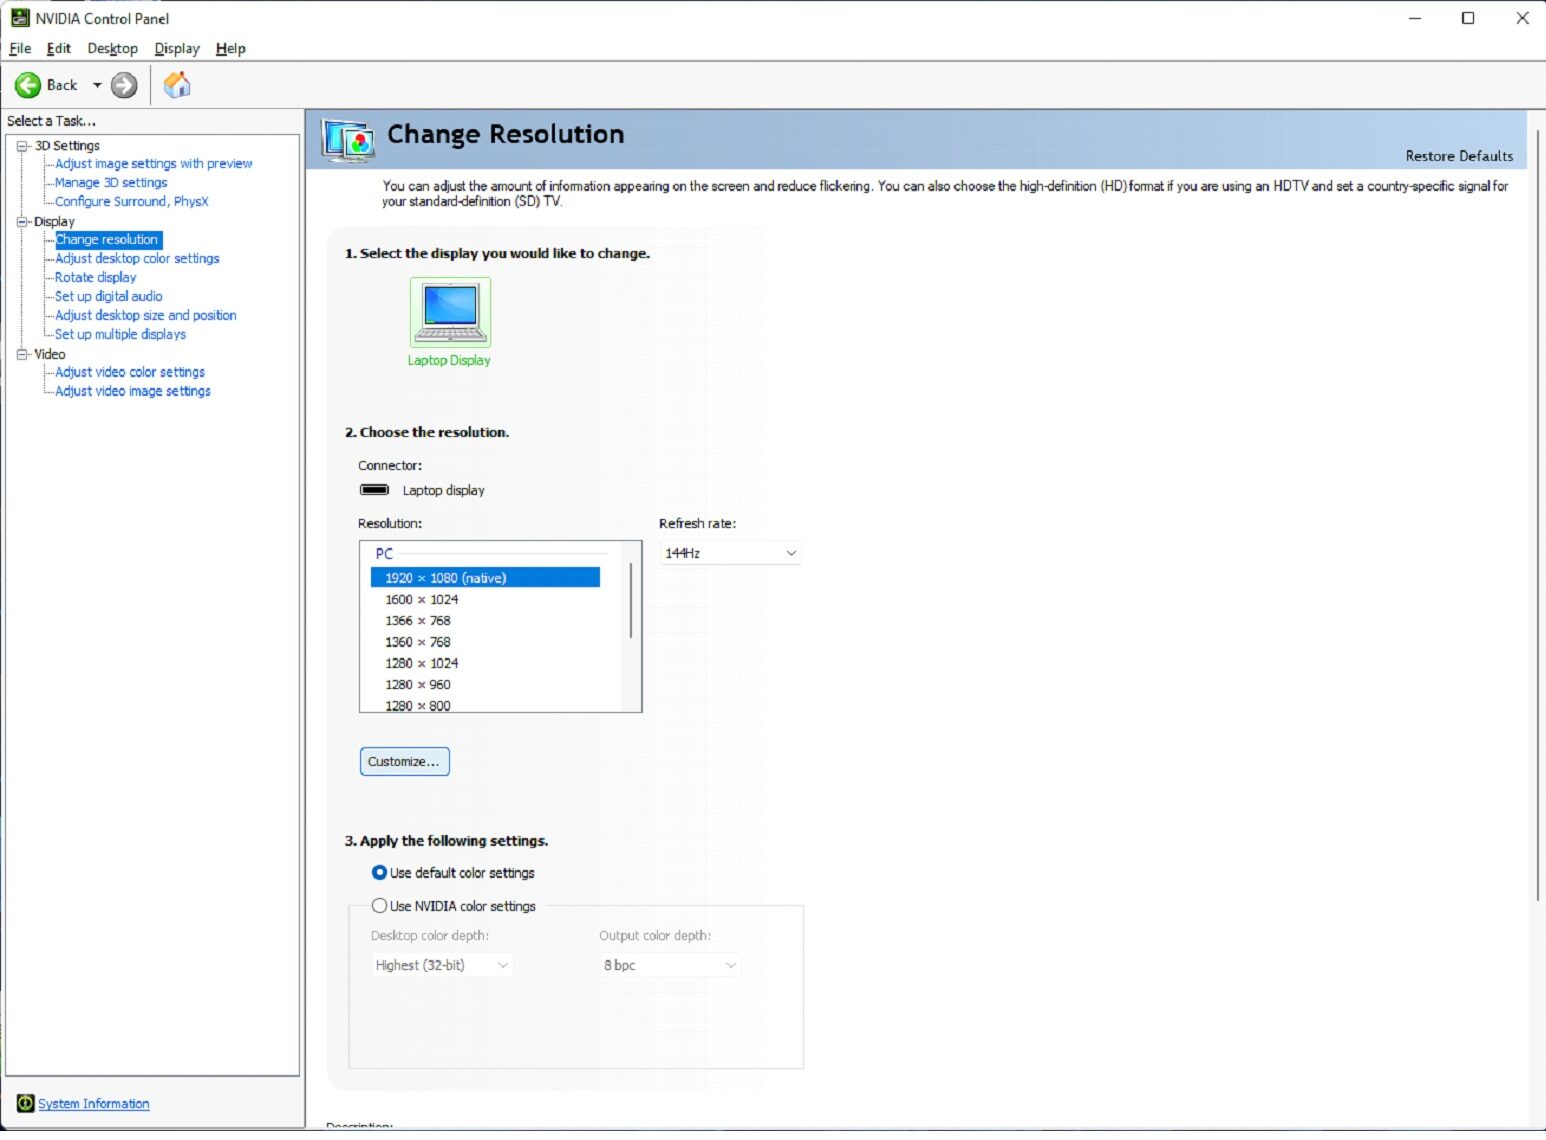
In the case of this guide, an NVIDIA-based graphics card was used so we’ll focus on that. (AMD Radeon settings are similar, however.)
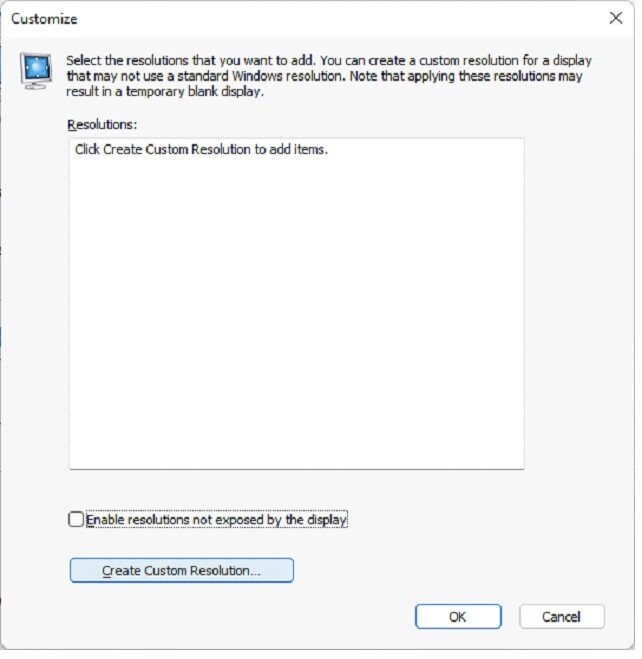
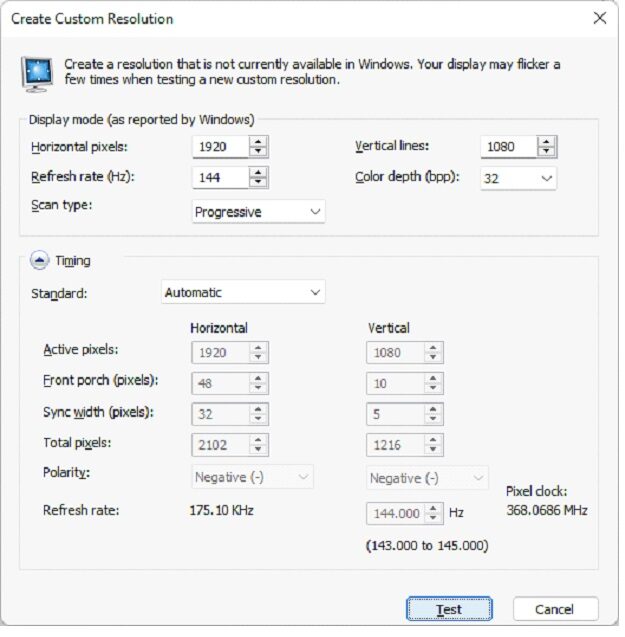
Under the display category of the NVIDIA control panel there is an option to change the resolution; choose this and click on the customize button. Next, click on the Create Custom Resolution button (you may be asked if you’re willing to accept the risks) and then specify the parameters that you wish to use.
From here the procedures are the same as in CRU, however in this case you actually get to test the settings before you can save them.
- RELATED ARTICLE: Best Budget 1440p 144hz Monitors
Should You Overclock Your Monitor?
In general, you should overclock your monitor if you expect that you’re either having issues that can’t be solved any other way and you need a quick, inexpensive way to bring your visuals to a higher level to smooth things out, reduce tear effects and/or resolve any other visual issues.
You may also want to overclock your monitor if you’re having trouble with opponents who may be moving faster than your monitor display can keep up with, making the difference between the satisfaction of that game-winning headshot and the embarrassment of getting sniped first.
But if you’re playing at a high resolution (such as 4K) then you don’t have much room for overclocking your monitor, and not all monitors can handle overclocking anyway.
Ultimately it comes down to preference and how far you’re willing to push the limits of your monitor display, so if you have the option (and are willing to take a risk on your equipment) then overclocking provides a quick, inexpensive means to increase the visual performance without much effort.
- READ ALSO: Most Expensive Monitors
Be the first to comment