
Please note: As an Amazon Associate I earn from qualifying purchases. I also work with other affiliate partners and may be compensated from the links below. Details here.
Today, we are going to be reviewing the ten best budget microphones for steaming in 2025.
When it comes to streaming, there’s a lot of equipment you need so you can create the best content for your audience. Other than a strong PC, the most important thing is a capable microphone, but you don’t need the most expensive one out there to get high-quality audio.
That’s why we picked out the best budget microphones we could find and rated them for you. So sit back, relax, and let us help you decide which is best for you.
Best Budget Microphones for Streaming in 2025 Round-Up
The table below will give you a quick look at our selections for the 10 best budget microphones for streaming currently available on the market. To read a full review, simply click on ‘review>>’ in the respective row.
Product | Image | Rating | |
1. AKG C22 ARA ''Best budget microphone for streaming in 2025 overall'' | 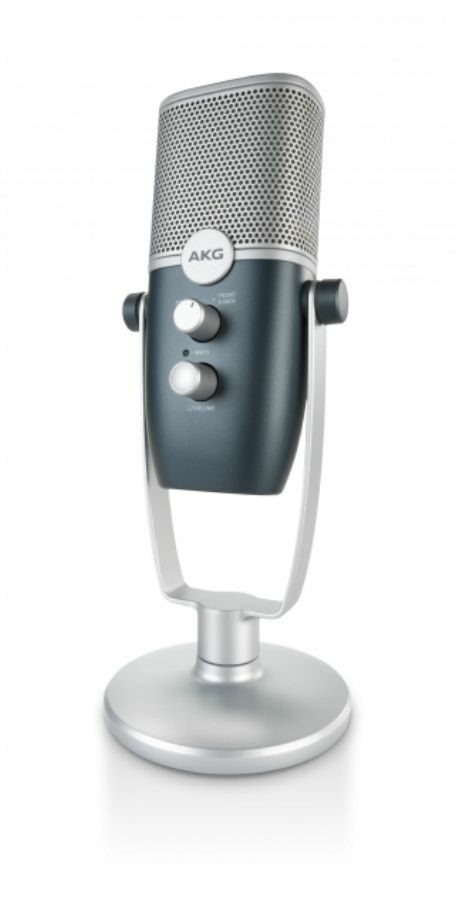 | 9.8 | |
2. Elgato Wave:3 ''Best budget microphone for streaming in 2025 runner-up'' | 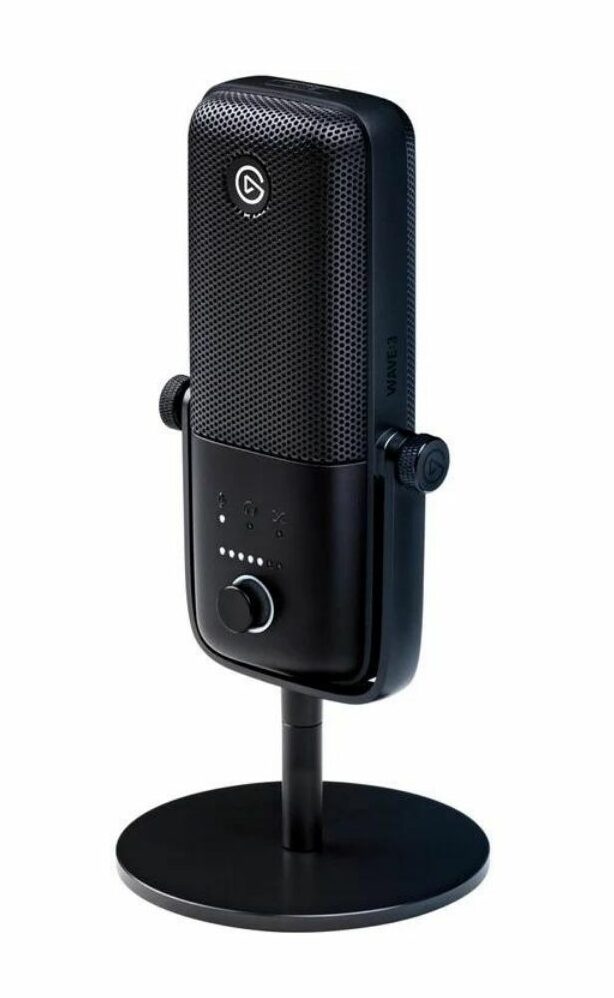 | 9.7 | |
3. HyperX QuadCast ''Most stylish budget microphone'' | 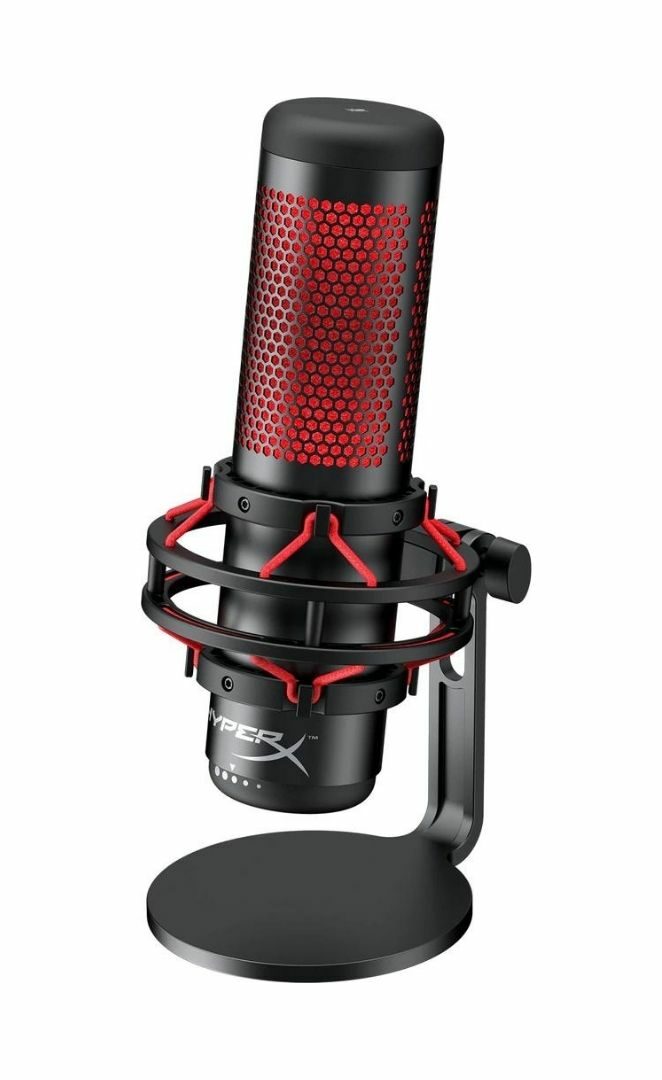 | 9.6 | |
4. HyperX SoloCast ''Best budget low-profile microphone for streaming'' | 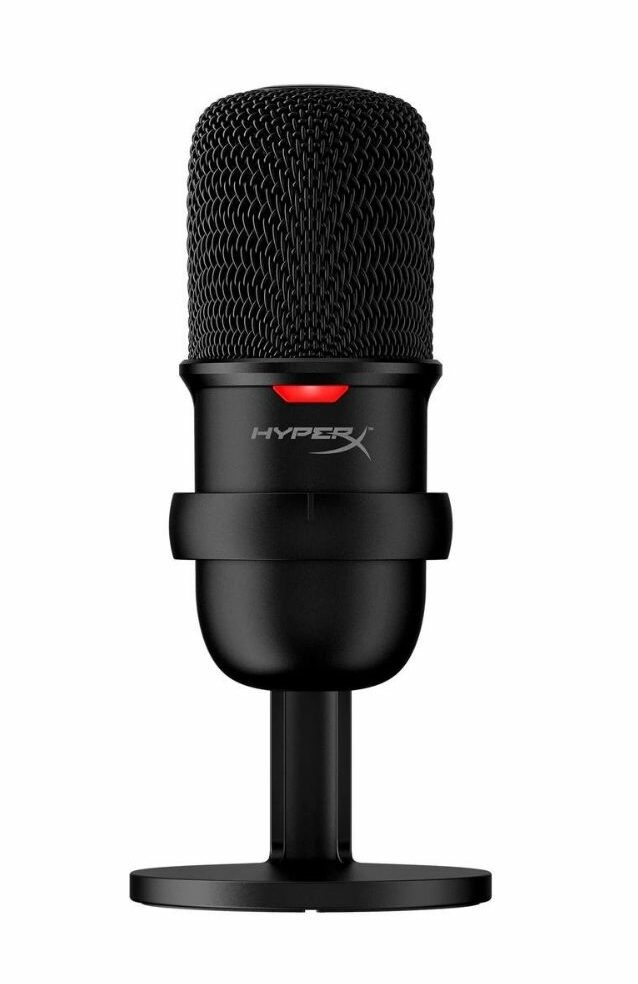 | 9.5 | |
5. Blue Yeti ''Most popular budget microphone'' | 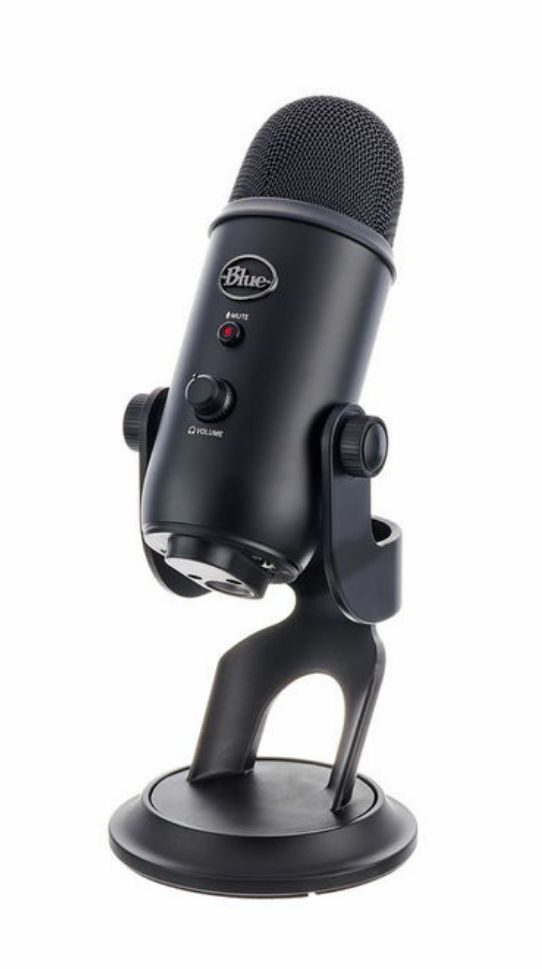 | 9.4 | |
6. MAONO AU-A04 ''Best bundle deal'' | 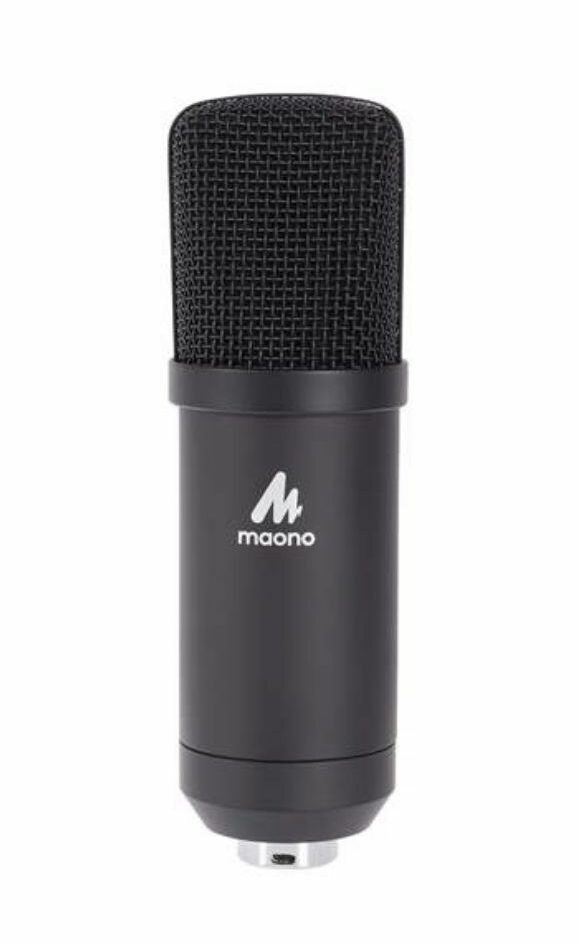 | 9.3 | |
7. Razer Seiren V2 X ''Best budget low-profile microphone runner-up'' | 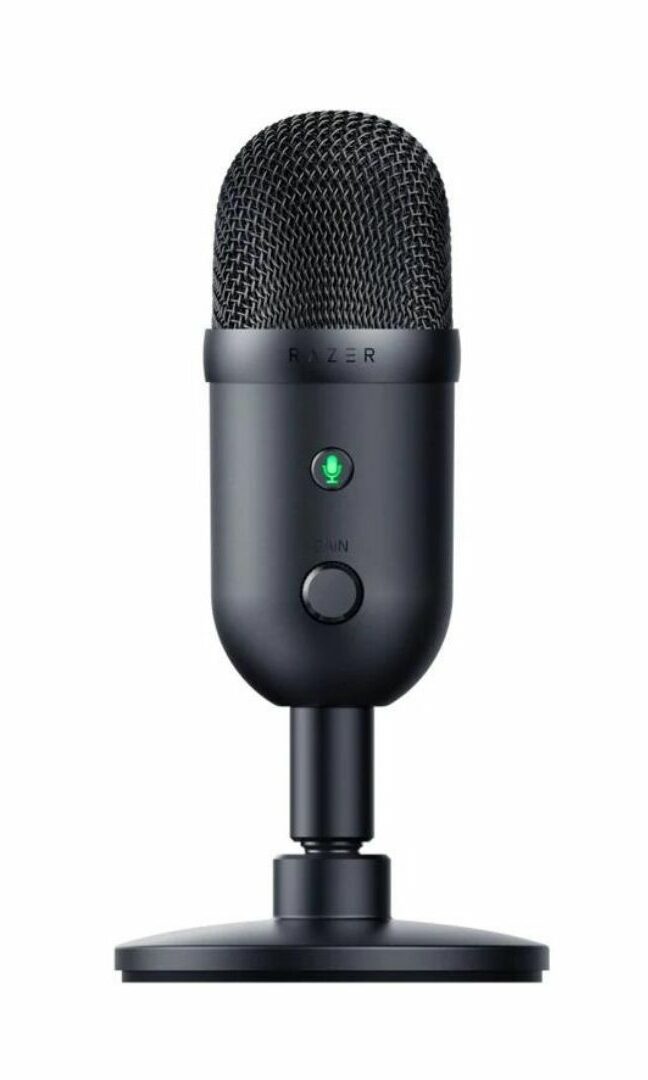 | 9.2 | |
8. Uhuru XM-900 ''Best budget XLR microphone'' | 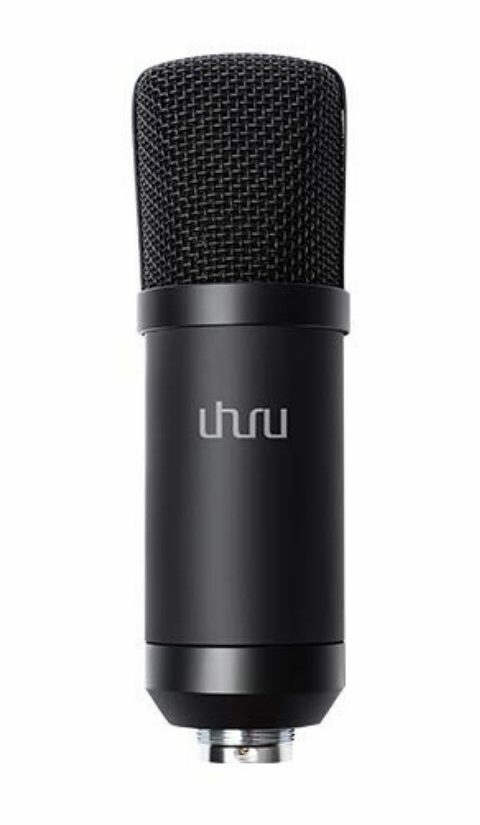 | 9.1 | |
9. CAD Audio GXL1800 ''Honorable mention'' | 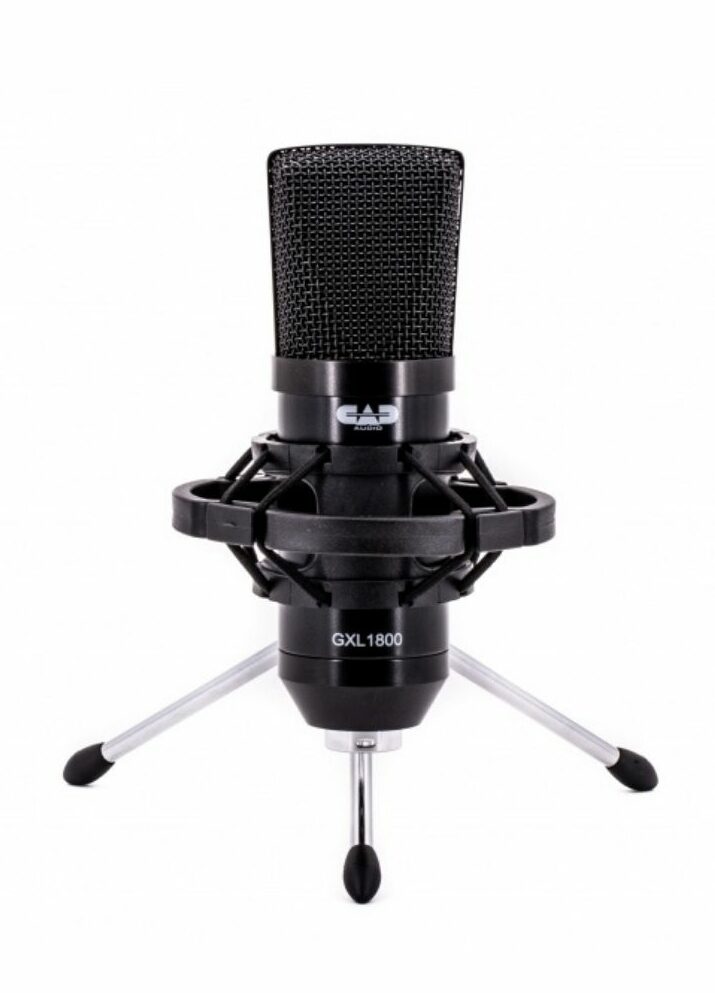 | 9.0 | |
10. Blue Snowball iCE ''Honorable mention #2'' | 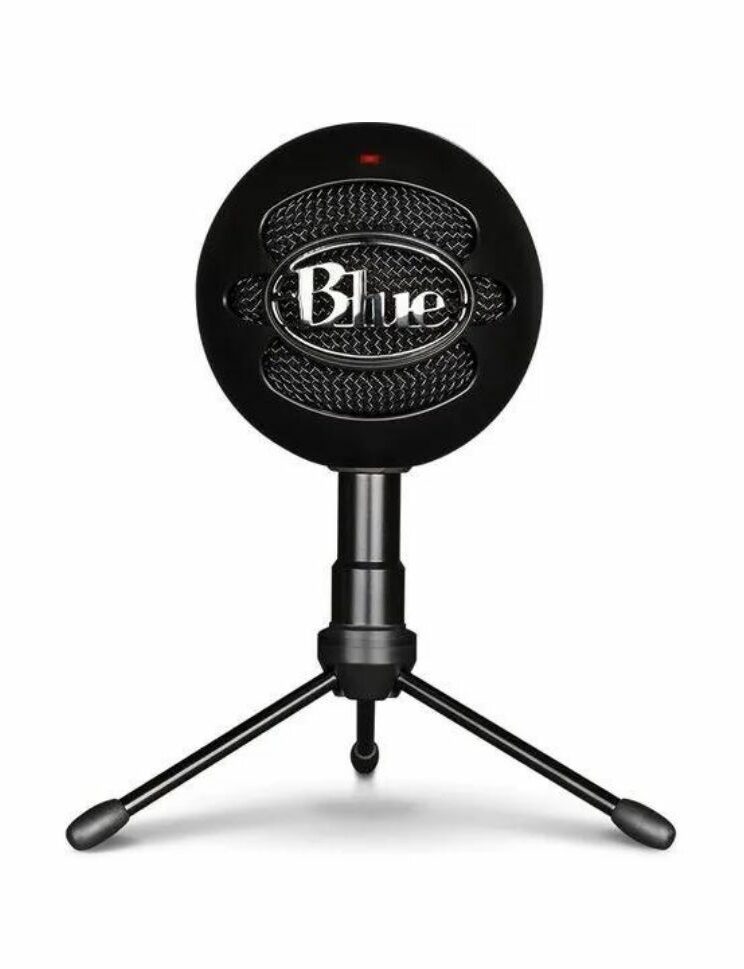 | 8.9 |
1. AKG C22 ARA
”Best Budget Microphone for Streaming in 2025 Overall”
Capsule: 2 Polarized condenser capsules | Frequency Response: 20 Hz – 20 kHz | Sample Rate: 24-bit / 96 kHz | Polar Pattern: Cardioid, Bidirectional | Sensitivity: 120dB (Max SPL) | Interface: USB-C | Dimensions: 9.05″ x 3.58″
REASONS TO BUY
- Crisp audio across the board
- High-quality construction
- Excellent value for the money
- Sleek design
- Plug & play
- Highly versatile
- Awesome anti-clipping technology
REASONS TO AVOID
- No onboard gain control
Our Rating: 9.8/10
AKG has been in the audio industry for over 75 years. They are one of the audio giants who defined what we would consider hi-fidelity audio and are still one of the leading experts in the audiophile world today. If you know anything about microphones, then you’ve heard of AKG.
So, it’s no surprise that the C22 ARA won us over with its beautiful-sounding audio and its clash of modern/vintage design. Its easy-to-use plug-and-play feature means it will work with a Mac, PC, Android, and even iOS (lightning adapter not included), so it’s extremely versatile.
Tucked away inside the box, you are going to find the AKG ARA microphone, a 6ft USB-C to USB-A cable, a 5/8 to 3/8 threaded mic stand adapter for attaching it to a boom arm, and all the paperwork, which includes an activation code for Ableton 11 lite.
Not only was sound quality a top priority for AKG when building this microphone, but the build quality was as well. It’s made entirely out of metal with a navy blue and matte silver color scheme. Both control dials are on the front. The top one allows you to change polar patterns between front only and front and back.
The bottom dial acts as the volume knob for your headphone pass-through as well as the push-to-mute button. Changing these settings, as well as clicking the mute button during your stream, will be very audible to your audience, so make sure you have these set before you start streaming.
Oddly enough, there is no gain knob, which is a little disappointing, but that can be controlled by software, so it’s not a huge deal.
Continuing on, the yolk and base are made of the same material as the rest of the microphone. And, if you take a look at the bottom, you’re going to find the USB-C port and a 3.5mm headphone jack used for pass-through monitoring.
The yoke screws onto the base, which is weighted and has a soft pad that acts as a grip and protector for your desk. You can easily unscrew the base and use either the threaded 3/8 adapter or screw it directly onto a 5/8 threaded boom arm.
Unlike its predecessor–the AKG Lyra–the ARA uses two cardioid stacked capsules rather than four. Using only the two capsules, this microphone forgoes extra polar patterns such as stereo or omnidirectional to give you high-quality audio with the two most used settings. Unless you are doing a podcast or something similar with a friend sitting across the table from you, you probably won’t use the front and back mode.
For being so affordable, we were blown away by how crystal-clear, warm, and full-bodied it sounded. This microphone uses outstanding anti-clipping technology and has a built-in pop filter and windscreen. Although this mic sounds best when you’re only a few inches from it, it does a great job of picking up voices even a few feet away. But ideally, you’ll keep it close, especially if you want that deep, authoritative voice.
As with any desk mic, the sound of tapping keys can be an issue. Surprisingly, the ARA does an excellent job at rejecting sounds outside of its optimal cone of influence, even sitting on the desk. It’s all but eliminated when used on a boom arm.
You will get a one-year warranty from AKG on this microphone. It’s nothing special, but it covers everything you would expect an electronics warranty to cover.
As you can see by where it has placed on our list, the AKG ARA is absolutely fantastic. It’s super easy to use; all you have to do is plug it in, and you’re ready to go. And, It’s made entirely of metal, so it’s built to last. It has a rich, beautiful sound that beats even the Elgato Wave:3, which is a close second and is the most expensive microphone we cover in this top ten review. The ARA is priced well under $100 at the time of writing, so it’s less than half the price of the Wave:3 and is an overall better microphone.
There are only a couple of downsides to this microphone. One is the fact that there is no control knob for the gain, and the other is that it’s a desk mic. But with the money you’d save in comparison to the Elgato Wave:3, Blue Yeti, or HyperX QuadCast, you can easily afford a boom arm to give your stream that professional-sounding quality.
With all that being said, it’s clear why the AKG ARA is the perfect mic for anyone and everyone looking to get into streaming without breaking the bank.
- YOU MAY ALSO LIKE: Best Audiophile Headphones for Gaming
2. Elgato Wave:3
”Best Budget Microphone For Streaming in 2025 Runner-Up”
Capsule: 17 mm Electret | Frequency Response: 70 – 20000 Hz | Sample Rate: 48 / 96 kHz | Polar Pattern: Cardioid | Sensitivity: -25dBFS/15dBFS | Interface: USB-C | Dimensions: 6.0 x 2.6 x 1.6 in
REASONS TO BUY
- Clear audio
- Simplistic design
- Tap-to-mute on the top
- Full on-board controls
- Excellent software
- Amazing anti-clipping technology
REASONS TO AVOID
- Feels a bit cheap
- Pricier compared to its competitors
Our Rating: 9.7/10
Elgato has been a big name in the streaming industry for years, but it has mainly been for things like stream decks and capture cards. Since Corsair’s takeover in 2018, things have started to change. The Elgato Wave:3 is an example of that. The Elgato Wave:1 and Wave:3 are the first USB condenser microphones made by Elgato, and we have to say, they’re pretty kick ass.
Seeing how Elgato’s main focus, up until now, has been video and streaming-related, it only made sense for them to expand into the audio scene as well. To really hit the ground running, Elgato brought Lewitt on board rather than designing one themselves with no audio experience. This has culminated in an excellent microphone that’s near the top of our list, and it should be near the top of yours, too.
We could stop right now and tell you the Elgato Wave:3 sounds great, and that would be an accurate and honest review. However, there are a few things you need to know.
Upon opening the box, you are presented with a short and sweet user guide. Underneath that, there’s a small box that contains a USB-A to USB-C cable that is not braided, an adapter for attaching the Wave:3 to a boom arm or mic stand, and a small booklet with all the technical information, compliances, and warnings.
Overall, the build quality is “meh”, but it looks modern and sleek. The Elgato Wave:3 is made mostly of black plastic, except for the grill and base of the stand, which are made of metal. On the front, there’s a dial for controlling the different features that are built into this microphone.
Above the dial, you will see a cluster of LEDs that indicate which mode you are in and the level to which it is set. And on the back are the USB-C port and the headphone jack for pass-through monitoring.
The arms and stem of the desk stand are made of the same matte black plastic as the microphone. The arms attach with two metal thumbscrews, and the stem threads onto the metal base. It’s good to see at least the base is metal, which gives it some weight, so it’s not so top-heavy when used as a desktop microphone. Additionally, all the threads are made of metal as well, making them harder to damage by accident.
To mount it to a boom arm, all you have to do is unscrew the base and attach the adapter to the stem. The adapter can take either 3/8 or 5/8 thread, so it will fit most arms. Being the most expensive on this list, we expected it to have better quality than this. But when it comes to performance, it’s obvious that’s where all the money went.
Using a cardioid pickup pattern, the Wave:3 does an excellent job at picking up rich-sounding vocals without being overly sibilant, nasally, or muddy. However, when set on the desk, there is no shock absorber in the stand, so the sound of tapping keys comes through heavily, but on a boom arm, it’s not such an issue, though the tapping will still be audible.
What’s probably the most impressive feature of this microphone is the proprietary anti-clipping technology. No matter how hard you rage or how loud you are, the Elgato Wave:3 will remain crystal clear.
To switch between the modes, you just press the dial to cycle through them. The onboard features include the gain level, headphone pass-through volume, and the monitor/PC mix, which is an awesome feature. Adjusting the monitor mix allows you to physically adjust how much you hear your own voice versus the rest of the audio being played on your PC.
This microphone requires the use of the Wave Link software available on Elgato’s website. It’s extremely intuitive and comes packed with all kinds of goodies. Not only does it allow you to control all the features of your microphone, but the Wave Link software also acts as a mixer. You can have up to six different audio sources going to your stream and control the volume of each.
Additionally, it allows you to control the overall volume to your audience using the slider labeled Stream Mix. The same goes for the volume of your Monitor Mix, which only you hear. This is also where you can activate your high-pass or low-pass filters, as well as the proprietary anti-clipping technology we mentioned before.
Elgato and Corsair cover this microphone with a two-year warranty. Just make sure to keep your receipt as they require proof of purchase, and you’ll have to send it to them before they honor the warranty. It does not cover intentional damage, loss, or theft and will be void if it has been resold.
When compared to microphones like the Blue Yeti, Audio-Technica AT2020, or the HyperX QuadCast, just to name a few, the Elgato Wave:3 really stands out with its audio performance, especially for a newcomer.
The Elgato website boasts that this microphone has been crafted and designed specifically for content creators and streamers. And with the features, software, and excellent audio capture capabilities, it’s obvious that they did their homework. There aren’t a bunch of polar patterns that nobody’s going to use, and all the features are designed to make streaming your audio simple while giving you tons of control.
But like we mentioned earlier, the build quality just doesn’t match the price tag; it feels very plasticky and cheap. We would hate to see what would happen if we dropped it. But considering the overall performance, we can’t bash it too much. We absolutely recommend this microphone for those of you looking to spend just a little bit more to get the best quality audio you can for your stream.
- RELATED ARTICLE: Best Budget AIO PCs
3. HyperX QuadCast
”Most Stylish Budget Microphone”
Capsule: Three 14mm condensers | Frequency Response: 20Hz – 20kHz | Sample Rate: 48kHz/16-bit | Polar Pattern: Stereo, Omnidirectional, Cardioid, Bidirectional | Sensitivity: -36dB | Interface: USB | Dimensions: 9.84 x 5.08 x 4.06 inches
REASONS TO BUY
- Sounds fantastic
- Quality build
- Stuffed with features
- Multiple pickup patterns
- Built-in shock absorber
- Built-in pop filter and windscreen
- Red LED accents
REASONS TO AVOID
- The red lighting might be obnoxious to some
- Lower resolution capture
Our Rating: 9.6/10
The HyperX QuadCast is an excellent piece of equipment. It has multiple pickup pattern settings and professional-grade sound, and it’s still affordable. What makes the QuadCast a top pick is the fact that it comes with features you would normally have to pay extra for, which we go over below.
Inside the box, you’re going to find the HyperX QuadCast already assembled, a boom arm adapter, all the accompanying paperwork, and lastly, a 9ft braided USB-A to USB-B mini cable. While this may seem a little long, it’s better to have more rather than not enough. It always sucks when you have just not enough cable to get something where you want it.
The body of the QuadCast is made from matte black plastic and is suspended in a ring with a collection of Bungee cables. This acts as a shock absorber to help lessen the sound of tapping from your keyboard or other movements. The stand allows for a decent amount of articulation, so you can adjust it to the ideal position, whether it’s on a desk or mounted on a boom arm. To attach it to an arm, just unscrew the base from the ring, attach the boom adapter, which fits 3/8 or 5/8 threads, and attach it to the arm.
Construction-wise, the honeycomb grill is made of metal and wraps around the red pop filter. Inside is an LED that acts as the mute indicator, and on the top is a tap-to-mute button. All you have to do is touch the button, and the microphone’s light will turn off, indicating you are no longer recording. Just tap the top button again to turn the light back on and, therefore, your mic.
While it has a gamer vibe with its red and black color scheme and LEDs, it only comes in red. If you would like an RGB microphone, HyperX also makes the QuadCast S, which is fully addressable.
On the bottom of the mic, you will find the gain control. It’s smooth turning and has little dots that help you adjust your sensitivity at a quick glance. The dial is able to turn past the dots but has a limit, so it may take some practice to figure out exactly where you like it.
What’s really neat about the QuadCast is that it has four different pickup patterns, and that is where it gets its name. On the far left, you have a stereo, which is good for binaural recording, such as ASMR. The second option is omnidirectional, which is great for multiple people in a room. You can set this microphone in the middle, and everyone will be heard easily.
The second to the last notch, and the one that most people will use, is the cardioid pickup pattern mode; in this mode, the mic will pick up sounds directly in front of it rather than to the sides or behind. This is perfect for streamers, gamers, and content creators.
Lastly, you have the bi-directional pattern, which is great for one-on-ones such as podcasts and other interview types of content because the pickup locations are in front of the mic and behind it.
When using the HyperX QuadCast, your voice will be heard clearly and sound full-bodied. When it’s placed on a desk, it’s able to pick up your voice very easily with little background noise. However, the sound of your keyboard will still come through, but there’s not a whole lot you can do about that; at least it’s not overwhelming.
When used on a boom arm, you’re able to get it closer to your mouth and, therefore, able to lower your gain levels resulting in crisper, more accurate sounding vocals. Additionally, this furthers the distance from your keyboard, raises the microphone off the desk, and helps eliminate all but the hardest tapping.
HyperX has a two-year warranty on its microphones. It covers manufacturing damage and defects but will not cover any physical damage not related to manufacturing.
For a little over $100, the QuadCast is a great deal. You’re getting a lot of extras that you would normally have to pay for, such as the very effective pop filter and the shock absorber. Not only are you getting cool extras, but you’re also getting a very high-performance microphone that looks good and sounds great; your viewers will appreciate the quality.
As with all streaming microphones, the HyperX QuadCast will benefit greatly from a boom arm, which can be picked up for cheap on Amazon. You don’t need to spend an arm and a leg on a fancy boom just to hold your microphone; save that money for better gear in the future.
- READ ALSO: Best Budget Pre-built Gaming PCs
4. HyperX SoloCast
”Best Budget Low-profile Microphone for Streaming”
Capsule: Electret condenser | Frequency Response: 20Hz-20kHz | Sample Rate: 48kHz, 44.1kHz, 32kHz, 16kHz,8kHz | Polar Pattern: Cardioid | Sensitivity: -6dBFS | Interface: USB-C | Dimensions: 3.1 x 3.1 x 7.1 inches
REASONS TO BUY
- Sounds great for its price
- Extremely affordable
- Quality build
- Versatile
- Tap-to-mute button on top
- Compact design
REASONS TO AVOID
- Needs a boom arm
- No extra features
- Picks up vibrations easily
Our Rating: 9.5/10
Now, let’s take a look at the Hyperx SoloCast. It’s compact, heavy-duty, extremely affordable, and works across multiple platforms. While it may not be the perfect microphone, it definitely tries hard to seem like it; the only thing we would have liked to see is it comes with a boom arm. But even without an arm, it does an outstanding job nonetheless.
Inside the box, you’ll find the pre-assembled HyperX SoloCast microphone and stand, a user guide, and a rubber-coated USB-C to USB-A cable. The cable is not braided but seems well made.
You’re going to be surprised when you feel the weight of this thing. Weighing in at 430 grams in all, the SoloCast is hefty for its compact size. It has a pill shape, eerily similar to the Seiren V2 X, which we will review later, but unlike the V2 X, the HyperX SoloCast is very affordable and performs well beyond its budget class.
It’s made out of sturdy matte black plastic with a black metal grill, and the microphone rests snugly in the stand when using it on your desk. To put it on a boom arm, all you need to do is pull it out of the stand and screw it on. It has both 3/8th and 5/8th metal threads, so it’s robust, and it fits most arms.
The stand is very adjustable. Not only can you tilt it 90° forwards and back, but you can also rotate it in 45° increments. This is impressive in such a lightweight and unassuming stand.
Another super cool feature this budget microphone has is a tap-to-mute button on top. The button is touch-sensitive and requires no force to activate, so you can silently mute your audio mid-stream if you need to. Additionally, there is an LED light on the front to indicate whether it’s muted or not. When muted, it will flash red; otherwise, it will stay off.
Whether you’re playing on a PC, PlayStation 4, PlayStation 5, or even a Mac, the SoloCast is able to work with them all. Additionally, it’s certified by Discord and TeamSpeak and works with all major streaming platforms like Streamlabs OBS and Xsplit, making it perfect for streamers on a budget.
Thanks to its high performance and low cost, you’re getting a great deal if you buy the HyperX SoloCast. It utilizes a cardioid pattern that narrows the focus of the pickup to directly in front of the mic and helps eliminate sounds behind it. That makes it perfect for streamers as it helps reduce the sound of typing on your keyboard.
However, it does not completely eliminate the sound. Each key tap sends vibrations through your desk, which will be picked up by the SoloCast because there is no shock absorber in the stand like you would see in the HyperX QuadCast, with its webbing, or the Seiren V2 X’s built into the stem.
When set on the desk, the HyperX SoloCast sounds really good, but it all depends on the positioning. The farther away it’s placed, the higher you’ll need to turn up the gain. This can result in unwanted background noise being picked up. However, the cardioid pick-up pattern really does its job because the quality loss is hardly noticeable. And surprisingly, popping wasn’t an issue.
As with any streaming microphone, the closer it is, the better, but there is always that sweet spot you need to find. You don’t want to be constantly yelling to be heard, and you don’t want to be swallowing the microphone, either. That’s why most streamers use a boom arm so they can adjust their mic to the exact position they want to get the best results.
HyperX has an impressive two-year warranty on many of its products, including microphones. This warranty will cover any manufacturing errors or faulty components but will not cover any physical damage not related to manufacturing.
So, all in all, hell yeah, the HyperX SoloCast is definitely worth it. It’s super cheap, sounds great, and it’s heavy-duty. One great reason to buy this microphone as a start-up streamer is because of how affordable and easy it is to use. There is no additional hardware or software required; just plug it in, and you’re ready to start streaming. Everything you need to control can be done within the Windows audio settings.
This is a great microphone for streamers who are just starting out and are on a really tight budget. You can always upgrade to a more robust model at a later date, but the HyperX SoloCast will get you started off right.
- RELATED READING: Best Laptops for Streaming
5. Blue Yeti
”Most Popular Budget Microphone”
Capsule: 3 Blue-proprietary 14mm condenser capsules | Frequency Response: 20Hz – 20kHz | Sample Rate: 48 kHz | Polar Pattern: Cardioid, Bidirectional, Omnidirectional, Stereo | Sensitivity: 120dB (Max SPL) | Interface: Mini USB | Dimensions: 4.72″ x 4.92″ x 11.61″
REASONS TO BUY
- High-quality audio
- Affordable
- Popular amongst streamers and gamers
- Full on-board controls
- Built to last
- Easy plug & play design
REASONS TO AVOID
- Self-noise
- Large
Our Rating: 9.4/10
So, here we have the Blue Yeti. Whether it’s famous or infamous, it’s hard to tell. It has a lot of hate from audiophiles but a lot of love from many in the gaming and streaming communities.
It’s extremely robust, has multiple pickup patterns, and sounds full and warm. However, one of the biggest complaints about the Blue Yeti is its size and self-noise, but we’ll get into that later.
When you open the box, you will find the Blue Yeti microphone, a 6ft Mini USB to USB-A cable, and all the accompanying paperwork.
Built like a tank, the Blue Yeti is rather large and constructed entirely out of matte black metal. It’s easy to see the appeal of this microphone; it’s obviously made to last. The microphone has a mute button with an LED light. The LED is a solid red when recording and flashes when muted. Below that is the headphone volume knob to adjust the volume of the pass-through into your headset–This allows you to monitor your voice so you know exactly how it sounds to your audience.
Oddly, the gain knob is on the back of the microphone, along with the pickup pattern dial. We think that’s a strange place to put the gain control. You would think they would place it in the front, seeing how much more important it is when compared to the headphone volume, which some people won’t even use.
To round out the basic features, on the bottom, there is the mini USB port, a headphone jack for the passthrough feature, and lastly, the threads for the boom arm. These are 5/8 threads, so if you plan on using an arm, make sure you get the right size.
Also made out of metal, the stand is heavy-duty and has a funky design. We can’t quite tell if we like it or not. The microphone attaches to the stand with two screw knobs. But if you use the Yeti on a boom arm, the threads of the stand will be left bare and are a little unsightly. While this has no impact on performance, it should be noted.
Okay, so what everyone wants to know is, how does it sound? Well, it sounds fantastic, up close, that is. The problem arises when you have to turn up the gain. When the Blue Yeti is positioned close to your mouth, with the gain turned down low, it picks up clear, full-bodied vocals full of warmth, with little to no background noise. This is why most people choose to use a boom arm because it allows you to get the perfect placement for the best-sounding vocals.
When placed on the desk, you really need this microphone to be positioned between you and the keyboard for the best performance, which is not ideal. That’s why most streamers who don’t have an arm set the mic off to the side and turn up the gain. Doing this allows for a less awkward setup but lowers the sound quality.
Further adding to the gain problem, the Blue Yeti is criticized by audiophiles for the amount of noticeable self-noise generated by the microphone itself. And during testing, there is a slight hum or buzz that can be heard even when it’s completely silent. Turning up the gain makes this hum even more noticeable. For a price tag of over $100, you would expect that to not be an issue, but here we are.
Blue Microphones backs the Yeti with a two-year warranty and will not be upheld if there is excessive wear or alteration or has been serviced by any parties not associated with Blue Microphones.
The biggest selling points of the Blue Yeti are the overbuilt construction, the sound quality when positioned properly, and how easy it is to use. The thing is built like a brick house, so it’s going to last a long time.
When up close and personal, the Yeti sounds awesome for what it is. You’re not going to get super high-fidelity audio with a ~$100 USB condenser mic, but the Yeti tries. And it’s so easy to use thanks to there being no software required. You can, however, download the Blue VO!CE app from their website. It has filters and other cool features to give your content that professional sound.
But is it worth the price tag? Well, that can be a tricky question to answer. If you already have a boom arm or are planning on getting one, then yes. But as a desktop microphone, it’s surprising there is no shock absorber, so we’re going to have to say no. We can see why this microphone has such a love-hate relationship within the creator communities.
- YOU MAY ALSO LIKE: Fastest Gaming Keyboards
6. MAONO AU-A04
”Best Bundle Deal”
Capsule: 16mm Condenser | Frequency Response: 30 Hz – 16 kHz | Sample Rate: 192kHz/24bit | Polar Pattern: Cardioid | Sensitivity: -38dB+/-3dB | Interface: USB
REASONS TO BUY
- Studio-quality audio
- Great value for the money
- All-in-one kit
- Easy to use
- Sleek and minimal design
- Affordable
REASONS TO AVOID
- No on-board controls
- Accessories are cheap
- Sensitive
Our Rating: 9.3/10
Here we have the Maono AU-AO4; it comes with everything a beginner on a budget needs. This microphone may not fit the needs of seasoned pros, but anyone who’s just starting their streaming, podcast, or other content adventure will love this microphone starter kit.
It is super affordable and sounds amazing, plus it comes with its own boom arm, pop filter, and windscreen. But for such a cheap microphone, you know there are going to be some cutbacks.
Inside the box, you’re presented with a foam cutout that holds the pop filter and windscreen. Under that, you’ll find the rest of the components. There’s the articulating arm, an 8ft USB-A to USB-B cable, a cheap shock absorber, the mounting bracket, and finally, the microphone itself, as well as a user guide and information booklet.
Surprisingly, for such a cheap microphone, it’s very well built. It’s made entirely out of matte black metal and looks like it could withstand a drop or two, but we’re not going to try that. One thing we noticed right away is that there is no way to control the gain level, and there’s no passthrough either. This means everything will need to be controlled through third-party software, which is not included.
Now, the included windscreen and pop filter are fantastic. You will want to use one or the other as it’s absolutely needed with this mic. Without them, the Maono is extremely susceptible to pops, so make sure to give them both a try and figure out which one you prefer.
The boom arm is relatively cheap; it’s very lightweight and seems to be made out of low-grade materials. And the shock absorber might as well just be for show. This microphone is very sensitive to any type of movement from the arm or any accidental touches. So, be mindful when recording so you don’t mess up an otherwise solid recording session.
Even though it’s so inexpensive, this microphone is on par with the HyperX QuadCast or the Blue Yeti, performance-wise. It uses a cardioid pickup pattern, so it’s best to have it positioned and pointed directly at you. Straight out of the box, the audio is full and rich, with no need for filters or any special software. Seeing how this microphone comes with its own boom arm, it does a good job at isolating your voice, especially when you get it in that sweet spot.
Maono offers a six-month limited warranty on their microphones. It’ll cover any manufacturing defects or faulty components but does not cover any loss or damage caused by modification, alteration, etc. Make sure you register your microphone within the first 10 days of purchase, or else the warranty will be voided.
Talk about bang for your buck; you get an awesome microphone with all the accessories for under $50. For this reason, the Maono AU-A04 is the perfect choice for beginning streamers or podcasters. However, the main issue is there is no gain control on the microphone itself. To control the audio settings like gain, you will need to use recording software. There are plenty of free ones out there, but it’s disappointing not to be able to control such features directly.
- RELATED ARTICLE: Fastest Gaming Monitors
7. Razer Seiren V2 X
”Best Budget Low-profile Microphone Runner-up”
Capsule: 25 mm Condenser | Frequency Response: 20 Hz – 20 kHz | Sample Rate: 48 kHz | Polar Pattern: Super Cardioid | Sensitivity: -34dB – 120dB (Max SPL) | Interface: USB-C | Dimensions: 7.25 x 1.75 x 3.25 in
REASONS TO BUY
- Sounds good for its price
- Looks sleek and modern
- Light and compact
- Analog gain limiter in software offers excellent anti-clipping
- Built-in shock absorber
REASONS TO AVOID
- Made entirely of plastic
- A boom arm is a must-have
- Expensive for what it offers
Our Rating: 9.2/10
Here, we’re going to take a look at the Razer Seiren V2 X microphone. The design is reminiscent of the Razer Seiren Mini, which was released in 2020. Unlike its predecessor, the Ryzen Seiren X, the Seiren Mini featured a pill-shaped design, and we see that here with the V2 X as well. A noticeable difference is the Ryzen Siren V2 X is larger and has a few added features that the Mini did not.
After opening the package, you are going to find the Razer Seiren V2 X, which will be in two pieces, a detachable USB-C to USB-A braided cable, a few Razer logo stickers, a product info pamphlet, and a user guide.
The Seiren V2 X is made entirely out of matte black plastic. It has three main pieces: the microphone itself, a stand adapter, and the base, which has a rubber pad to keep it from sliding around. The stand also has a shock absorber. This helps lessen the sound of tapping on your desk, whether by accident or while typing.
The microphone can be removed and placed on a boom arm, which is highly recommended. Unfortunately, this microphone does not come with an arm, so you’ll have to buy that separately.
On the microphone itself, there’s a mute button with an LED light built-in. The light will be green when it’s actively recording and red when it’s muted. It also has a gain knob to adjust the pickup. The knob turns smoothly with no tactile feedback, and there are no hash marks for quick reference. It will spin continuously, and the only way to know the gain level for sure is by checking your sound settings or using the Razer Synapse software.
There is also a headphone jack on the back, which allows you to hear your own voice to keep track of your audio levels and quality while streaming. Below the headphone jack is the USB-C input for the power cable.
The software is unimpressive; it allows you to change the volume of your mic and headphones, which you can do with your basic Windows settings. The only thing that’s appealing about the Razer Synapse software is that it allows you to toggle the analog gain limiter.
This feature is handy for when you oversaturate your audio and the sound becomes distorted. The analog limiter will automatically adjust the gain to keep the audio from redlining, letting you concentrate on your stream and less on your audio.
Overall, the sound quality of the Seiren V2 X is so-so; it does a pretty good job, but it could be better. On the desk, it sounds decent, especially seeing how it’s so far away from your mouth. The audio is clear but isn’t as full as it could be. When placed on a boom arm and positioned close to your mouth, your voice will sound much more full-bodied.
However, the Seiren V2 X doesn’t have a pop filter, and the wind block is rather poor. This results in puffs and pops while speaking being picked up easily. This isn’t what your viewers want to hear, so we recommend getting a pop filter and windblock.
Thanks to the super-cardioid pickup pattern, the Razer Seiren V2 X does a very good job at picking up your voice and not the background noise. It is designed to pick up sound in a narrow cone in front of the microphone, but it is also able to pick up sounds close behind it. Therefore if you position your keyboard directly behind this microphone, it will pick it up. Just another reason why we recommend using a boom arm with this microphone.
Razer covers this microphone with a one-year warranty. It does not cover any accidental damage, acts of God, misuse, third-party software, etc.
At the end of the day, the Razer Siren V2 X is a decent budget microphone. It costs just under $100 and looks very sleek and modern. But for the price, we expected more. The software is very limited, the audio is okay but can be poppy, and it absolutely needs a better windscreen. While it’s not a terrible microphone, there are better options out there for less than half the price.
- READ ALSO: Most Expensive Monitors
8. Uhuru XM-900
”Best Budget XLR Microphone”
Capsule: 16mm condenser | Frequency Response: 20 – 18,000Hz | Sample Rate: 192kHz/24bit | Polar Pattern: Cardioid | Sensitivity: -34dB ± 3dB | Interface: XLR
REASONS TO BUY
- XLR delivers higher quality audio compared to USB
- Sounds fantastic
- Comes with a boom arm and pop filter
- Professional look
- Long cable
REASONS TO AVOID
- XLR requires an external amp or audio interface for power
- Accessories are cheaply made
- No on-board controls
Our Rating: 9.1/10
Next up is the Uhuru XM-900. This microphone sounds crisp, full-bodied, and warm. But unlike most others on this list, it uses an XLR cable, which means it requires an external power source. You can use any audio interface of your choice; just make sure it’s capable of supplying at least 48 volts of phantom power.
Otherwise, the XM-900 will not work, and therefore, is a huge downside for beginner streamers. Because not only do you have to dish out around $50 for the microphone kit, but you will also need another, roughly $50 piece of hardware just to use the XM-900. But other than that, this is a fantastic microphone.
Opening the fold-top box presents you with a foam insert that holds the windscreen and pop filter. Additionally, there is a small card with customer support information and a folded-up user manual. Under the first foam retainer is another retainer that holds the microphone itself, an 8-foot XLR cable, the boom arm, the shock absorber, and the desk clamp. As you can see, this kit comes with everything you need to start streaming high-quality audio–except an amp.
The build quality is exceptional for its price point. The XM-900 is primarily constructed of black metal and has some good weight to it. The boom arm and shock absorber are made out of the same black metal and feel high-quality.
There are no buttons, knobs, dials, or switches on the Uhuru XM-900, so everything will need to be controlled through third-party software. This gives it a very minimal and sleek design at the expense of not being able to quickly change your settings on the fly.
If you were to break down all the components of this kit and isolate the microphone, it would cost around $30. And for a $30 mic, the XM-900 sounds absolutely fantastic. Plosives are handled well, but make sure you use the pop filter and/or windscreen to get the most out of it. While it handles the pops well, it doesn’t completely cancel it out without some type of filter.
This mic works great for content creators due to its cardioid pickup pattern. It ensures the microphone will pick up audio directly in front of it while rejecting audio from the sides and behind. Due to this, you need to make sure that it is facing the correct way.
The front of the microphone has the Uhuru logo, so when you set this up for the first time, make sure that side is facing you. Thanks to its polar pattern, boom arm, and shock absorber, typing on your keyboard will not be aggressively apparent to your audience.
Uhuru provides a one-year warranty on all of its products. Additionally, they provide lifetime technical support and a 30-day money-back guarantee. Uhuru will replace or refund any product within that time period.
So it looks great, sounds great, and comes with all of the accessories. But is the XM-900 worth it? Well, that depends. If you’re already capable of supplying the power that this microphone needs, then hell yes! But unless you can snag an amplifier for cheap, we’re going to say no.
It can already be a daunting task to set up a microphone and camera and get everything ready to start streaming for the first time. The last thing you want to worry about is all this extra gear that you are unfamiliar with.
- RELATED READING: Best Pink Keyboards
9. CAD Audio GXL1800
”Honorable Mention”
Capsule: 1” dia. high sensitivity capsule | Frequency Response: 20Hz – 20kHz | Sample Rate: 192 kHz / 24-Bit | Polar Pattern: Cardioid | Sensitivity: -27dBV | Interface: XLR | Dimensions: 8 x 8 x 4″
REASONS TO BUY
- XLR delivers higher quality audio compared to USB
- Comes with a shock absorber
- Modern look
- Sounds good after some tweaking
REASONS TO AVOID
- Self-noise
- Poor build quality
- Flimsy desk stand
Our Rating: 9.0/10
Here’s another budget XLR microphone, and overall, it’s decent for the price. However, like any other XLR microphone, the CAD GXL1800 is going to need an audio interface to supply 48 volts of phantom power. So, if you already dabble in recording music and so on, you probably already have an amp for your dynamic microphones and other recording instruments. But if you’re just starting out, you need to know that this microphone requires additional equipment not included.
In the box, you’re going to get the CAD GXL1800 microphone, a plastic shock mount, a very small tripod stand, a 6-foot XLR cable, and a foam windscreen, along with all the paperwork.
The build quality is super cheap. It’s made almost entirely out of black plastic except for the grill, which is made out of a black metal mesh. The shock mount is kind of flimsy and is made out of the same black plastic as the microphone itself. Additionally, the tripod that’s included is rather small and doesn’t leave much room for the XLR cable coming out of the bottom of the mic, but it’s better than nothing. As usual, with desktop microphones, we recommend using a boom arm.
There are no dials or switches to control any settings on the microphone itself. This means you’ll have to use third-party software or an audio interface, which is not included. What’s more, when you set this microphone up, you need to make sure that the correct side is facing you. Seeing as this is a condenser microphone using a cardioid pickup pattern, it needs to be oriented in the right direction. The front of the microphone is where all the branding is located, making it easy to know which side is which.
The sound quality is decent, but self-noise is an issue. This microphone is extremely sensitive, so very little gain is needed when recording. Because of this, it’s best to be only a few inches away from the microphone while using the included foam windscreen. This way, the microphone will pick up your voice clearly while giving it a deep, boomy sound while being less sensitive to plosives and puffs.
Due to the sensitive nature of this microphone, it’s very susceptible to any tapping on your keyboard while streaming, regardless of whether or not it’s on the desk or boom arm. Unfortunately, there’s not much you can do about that, but the windscreen will help lessen the sound reaching your audience.
As we mentioned earlier, this can be a noisy microphone. Make sure you use it at low gain, but some post-editing may still be necessary.
CAD Audio provides a two-year warranty with their products and will either repair or replace the product with one of equal or greater value. The warranty will cover any defect or manufacturing damage but does not cover any excessive wear or damage from abuse, misuse, or modifications.
When it comes right down to it, we’re looking for the best bang for our buck, are we not? So, for around $40, we’d have to say you’re getting one heck of a bang. There are a few problems, however.
The build quality is rather poor, and unless you are practically eating the microphone, its self-noise level is high enough to sound like you are recording at the beach. Additionally, the included desk stand is so low you will throw your back out trying to speak into it properly without a boom arm.
But when you have it positioned properly and the settings tuned just right, it sounds fantastic. The CAD GXL1800 will work great for any streamers or content creators. Even amateur musicians and vocalists would love this microphone as a starting point. Just don’t drop it.
The biggest issue we have with this microphone kit is that it is not everything you need to get started. You will need an audio interface to supply power to this microphone; otherwise, it will not work at all. Therefore, we cannot recommend this microphone as one of the best microphones for beginning streamers on a budget. However, if you already have the equipment, this microphone is worth having.
- YOU MAY ALSO LIKE: Best Pink Gaming Headsets
10. Blue Snowball iCE
”Honorable Mention #2”
Capsule: 14mm condenser capsule | Frequency Response: 40 –18 kHz | Sample Rate: 44.1 kHz/16 bit | Polar Pattern: Cardioid | Sensitivity: 120dB ( Max SPL) | Interface: Mini USB | Dimensions: 325mm sphere
REASONS TO BUY
- Simple to use
- Compact design
- Affordable
- Long cable
- Sounds decent on a boom arm close to your mouth
REASONS TO AVOID
- Very low profile
- Nasally sound
- Feels cheap
Our Rating: 8.9/10
So, now let’s talk about the Blue Snowball iCE. It comes from a long line of Blue ball-type microphones, like the Snowball, the Kickball, and the Eight Ball. What makes this one stand out is its simplicity and affordable price. With the Snowball iCE, Blue is catering to the budget crowd who are interested in streaming and podcasting. This is a great introductory microphone for the budget-conscious buyer, but is it the best?
Inside the box, you are going to find the microphone, a cheap desktop tripod, a 6ft Mini USB to USB-A cable, and a quick start/user guide with all the technical information.
For the price of this microphone, the build quality isn’t too bad. It’s made entirely out of glossy black plastic except for the grill, which is a stainless steel mesh. The included stand is a cheap collapsible tripod. It’s made out of plastic, doesn’t have a shock absorber, and the legs feel very flimsy.
Additionally, the stand is so tiny you have to put the microphone at its maximum tilt so it points toward your face. And even then, it’s well away from the sweet spot unless you want to bend over or set it on a stack of books. With all that being said, surprise, surprise, we recommend using a boom arm with this microphone.
Near the top of the microphone, you will see a red LED light. This light shines whether the microphone is on or off and does not indicate mute or recording statuses.
On the back, there is a mini USB port to plug into your computer. And going to the bottom, we find the 5/8 mounting threads. These threads are made out of metal, so it’s hard to damage them accidentally.
Call us surprised. The Blue Snowball iCE actually sounds pretty good for how cheap it is. It is on par with the Blue Yeti Nano or Razer Seiren Mini, just to name a couple. The biggest issue we noticed is the sharp drop-off of audio quality the further you get away from the mic. Up close and personal, the Snowball iCE sounds very full. But once you back away from it, the sound becomes nasally, and the low tones are very subtle.
Plosives are the next biggest issue. This microphone is best used with a pop filter. Really, any aftermarket pop filter or even a windscreen would greatly increase the performance of this microphone. Otherwise, your audience will have to deal with the sudden pops, and nobody wants that.
What makes this microphone perfectly suited for first-time streamers is its easy Plug & Play nature. There is no necessary software, so all you have to do is plug it into your computer, have your favorite recording software recognize the microphone, and you’re ready to go.
Blue backs their microphones with a two-year warranty and will not be upheld if there is excessive wear or alteration or has been serviced by any parties not associated with Blue Microphones.
Is the Blue Snowball iCE worth it in 2025? We’re going to have to give it a hesitant yes. The biggest reason to buy this microphone is just how affordable it is. For around $70 or less, you’re getting a pretty good, ready-to-go, out-of-the-box microphone that is super easy to use and sounds great.
But the included stand is just horrible; you’re going to want to buy a boom arm or a higher-quality desk stand, as this one is just so short and fragile.
In the end, we recommend this microphone for any aspiring streamers finally taking the plunge to put themselves out there and entertain the masses. Because with the Blue Snowball iCE, you can have decent audio without breaking the bank.
- RELATED ARTICLE: Best Gaming GPUs Under $400
Final Words
There you go; these were our picks for the ten best budget microphones for streaming in 2025.
We hope you have a good feel for what these budget microphones are all about. Each one of them has its strengths and weaknesses. But on their own, they are all good microphones, so it will all come down to your personal preference.
Lastly, if you have any additional questions, feel free to reach out to us via the comment section below, and we’ll be more than happy to help you out. We love hearing from you!
Be the first to comment