
Modern games use engine-based tools for more practical game applications, allowing for the same game to run on multiple devices, including Xbox, Switch, iPhone, and basically any Android device you can think of.
This allows for anything from top-down puzzle games, sideways platform action games, roleplay games, and 3D exploration and shooting from either first or third-person perspectives. This includes some of the more popular games and series.
Mortal Kombat, Mass Effect, Gears of War, Fortnite, and other popular games have all used some sort of engine backend in at least some capacity.
While this does occasionally involve custom, in-house tech (EA’s Frostbite comes to mind), the vast majority of the time will be spent dealing with more widely available tools such as Unreal and Unity. And it is the latter that we’ll be getting to know in this guide.
Getting Started
Start by going to the Unity website and opening the Download page. From here, open the developer tools menu and select Download Unity. Select the Download for Windows option to begin the download process and follow the instructions. After that, the Unity Hub will be installed to your system.

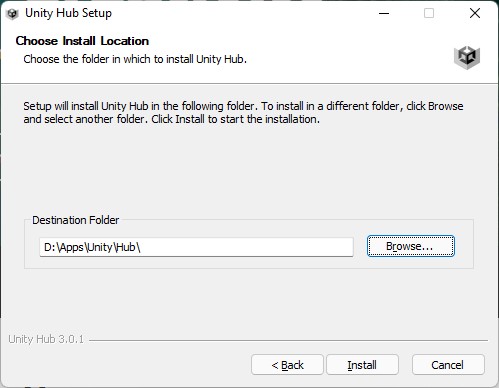
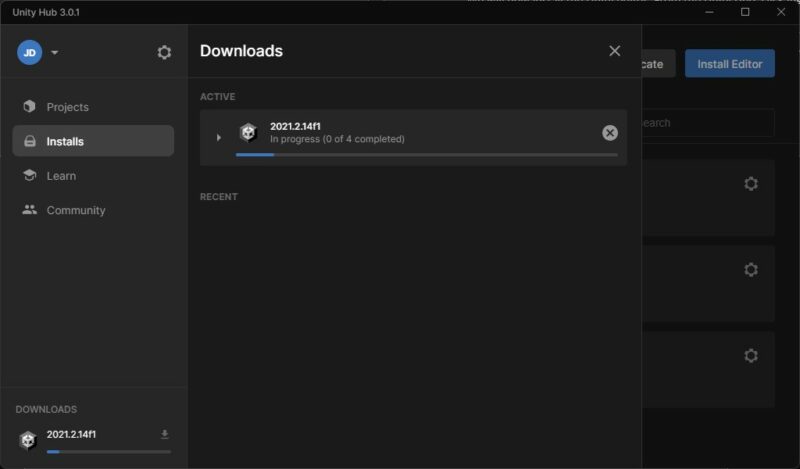
We will now install the Unity editor. From the Unity Hub, click Installs to load the list of editor versions that are available on your system. For most cases, the LTS builds (meaning long-term support) will be sufficient, so we’re going to install the latest version from that list.
We will load the list from the Install Editor option, so click that. As of this guide, the most recent LTS option is 2020.3.30f1; however, this is obviously subject to change as new updates become available.
However, it is also possible to download this and previous LTS releases (as well as test versions and updated builds that may offer features not yet present in the LTS builds). We’ll be using the most up-to-date build as of the publication of this guide (which is 2021.2.14f1).
While configuring Unity the available options for deployment are also up for selection, these are used to determine which targets will be available for distributing the game.
For the purpose of this guide, we will use Windows Support via IL2CPP as well as WebGL Support, so scroll down to these options and check them off.
Also, be sure to install Visual Studio while installing the editor, as we’ll need it later on. (Note that If Visual Studio is already installed, this will be detected, and the selection will be locked). Now click Install, and the process will begin.


-
- YOU MAY ALSO LIKE: Best Budget Laptops for Programming
Creating a simple program
Now it’s time to see how Unity works. We’ll create a 2D project with a simple GUI display routine that shows a greeting. However, we’ll take it further than usual and set the message based on what time of day it is.
However, we’ll make a small change to how we make the determination. Specifically, we’ll work with hours instead of seconds.
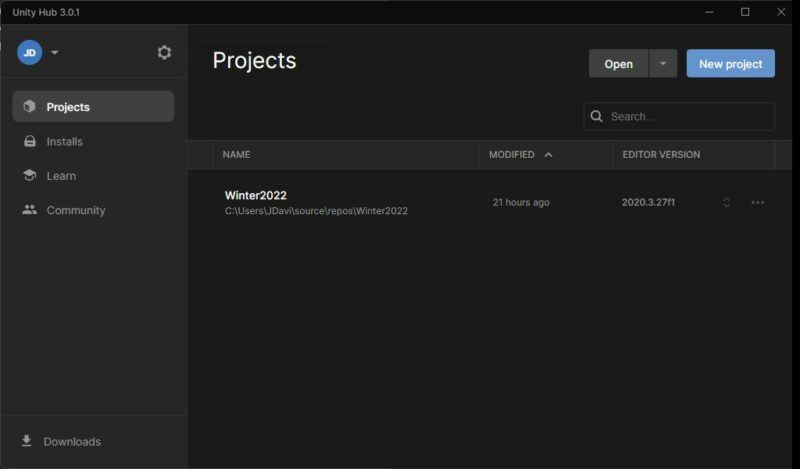
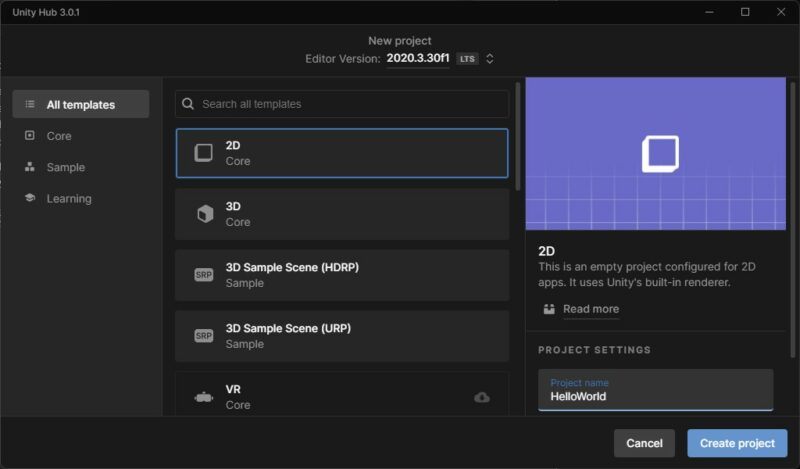
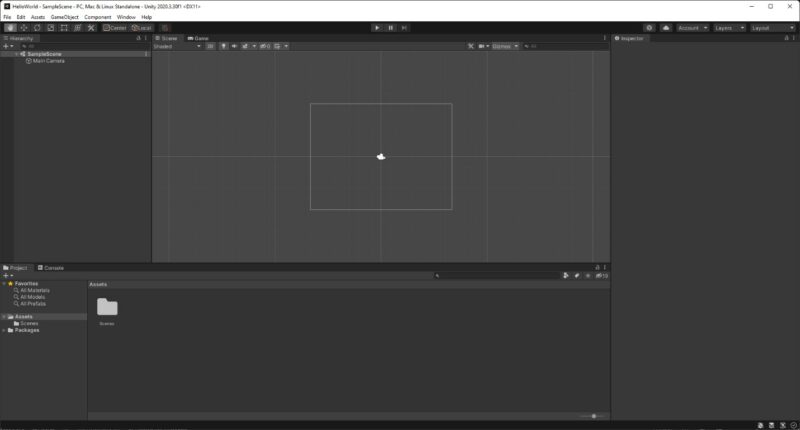
In the Unity Hub, under the Projects screen, we’ll select the New Project option. Select All templates and then select 2D from the list that appears. Name it HelloWorld and select Create Project.
It may take a few minutes for the project to be ready, but once complete, the project will look like this:
Our next step is to create a simple script that will display the message. Unity uses C# for its script code, which is why we included the Visual Studio package when installing the editor.
But before we get to that, we need to configure the project properly for script editing. From the Edit menu, select Preferences and open up the External Tools category.
From here, under External Script Editor, change the setting from being based on the file extension to being based on the installed Visual Studio package. Also, check off the box to create Visual Studio solutions using player project settings like so:
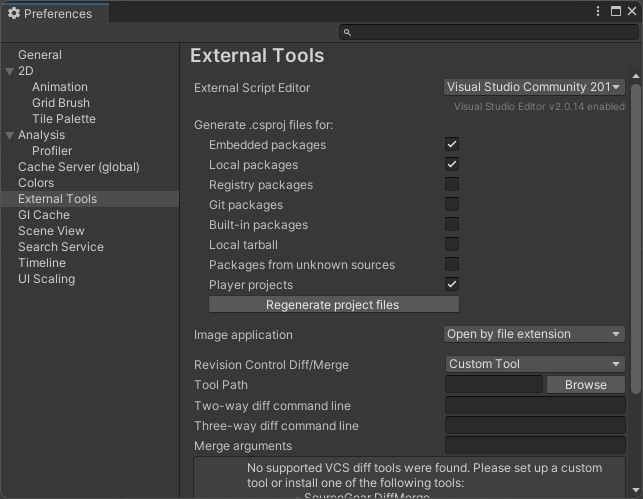
Note that embedded packages and local packages are automatically checked off, so leave them as-is. You can now close the preferences window since we don’t need it for anything else right now.
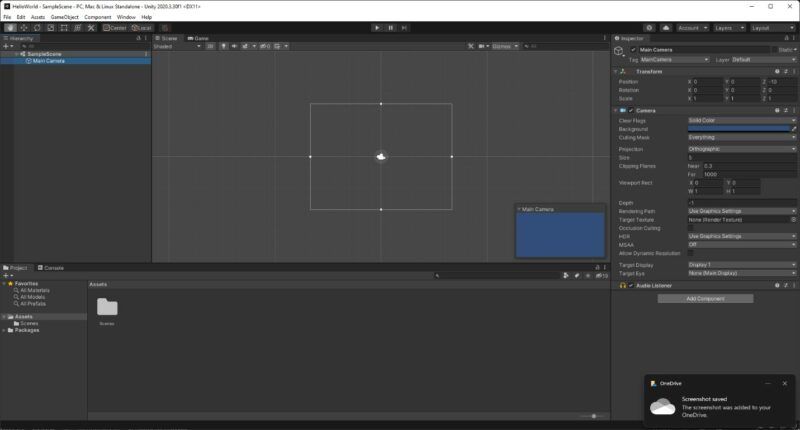
Next, we will create the script file. Click on the Main Camera so that it’s highlighted like this:

After that, choose Add Component from the Inspector sidebar:
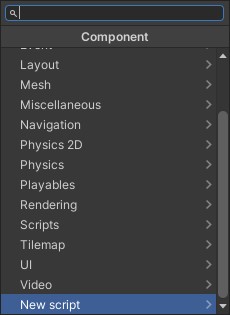
Select New Script and name it Greeting, like so:
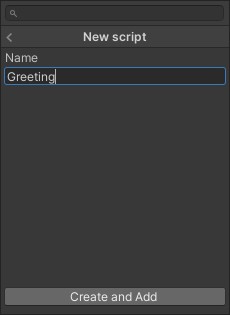
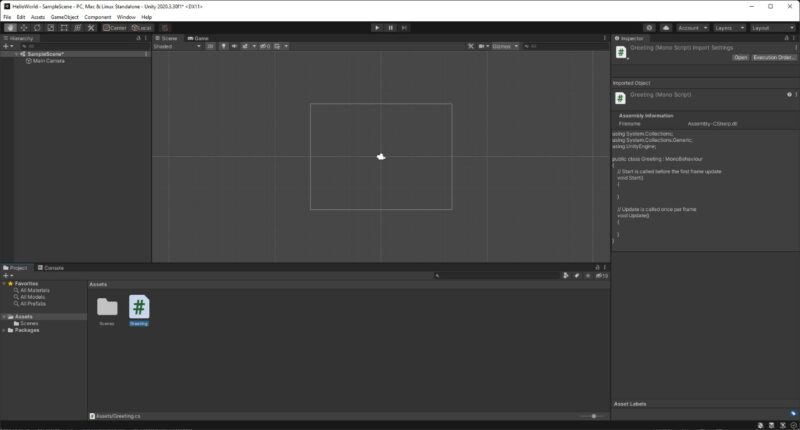
Click on Create and Add. The script will be added to the editor like so:

Now, from the Project Browser, double-click the Greeting script to open it in Visual Studio:
- YOU MAY ALSO LIKE: Best All-in-one PCs
Now, here’s where it gets tricky. If we follow the previous guide as we did before, the portion of the script that will display the message will not be able to read the variable definitions that will determine the displayed message.
To resolve this problem, we will instead add it to the beginning of the class definition, along with a variable to store the message itself:
public class Greeting : MonoBehaviour
{
string message = “”;
System.DateTime clockCheck = System.DateTime.Now;
Note that the DateTime class is not directly accessible simply by typing it out on its own; instead, we access it through the System namespace. If you prefer the other way, however, you can add the following line at the very top of the script:
using System;
Now, we need to add the time determination logic. In the Start function, add the following script code:
if (clockCheck.Hour <= 11)
{
message = “Good Morning”;
}
else if (clockCheck.Hour >= 12 && clockCheck.Hour <= 16)
{
message = “Good Afternoon”;
}
else if (clockCheck.Hour >= 17 && clockCheck.Hour <= 20)
{
message = “Good Evening”;
}
else
{
message = “Good Night”;
}
Now, we need to add a special function that is required for GUI processing. This is not included by default, so we’ll be adding it manually. Between the Start and Update functions, add the following code:
void OnGUI()
{
GUI.Label(new Rect(10, 10, 150, 100), message);
}
Note that the label definition must be in an OnGUI block; it will not work in any other function.
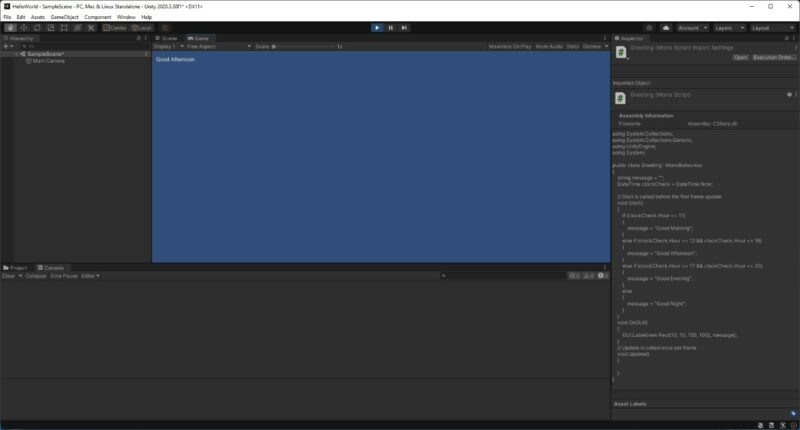
Now save the script, return to the Unity editor, and click the play button.
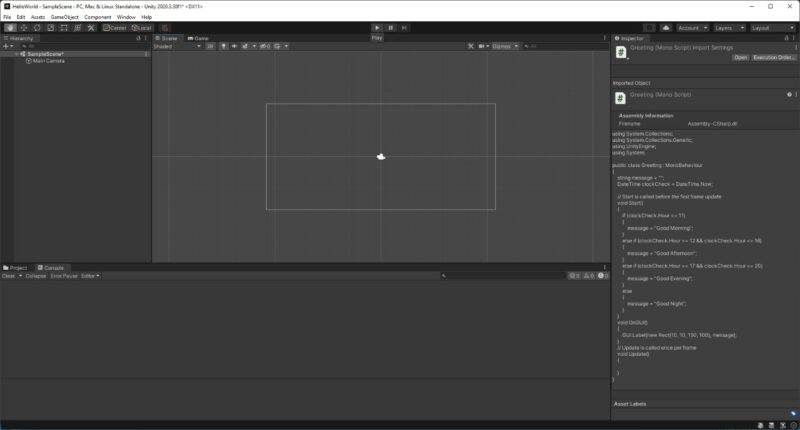
And here’s the result based on when this was added to the guide:
Analyzing a Simple Game
With that, we have a simple program that displays text based on time. However, what we’re really interested in is building a game, so we’re going to look at how an actual game functions when working in Unity.
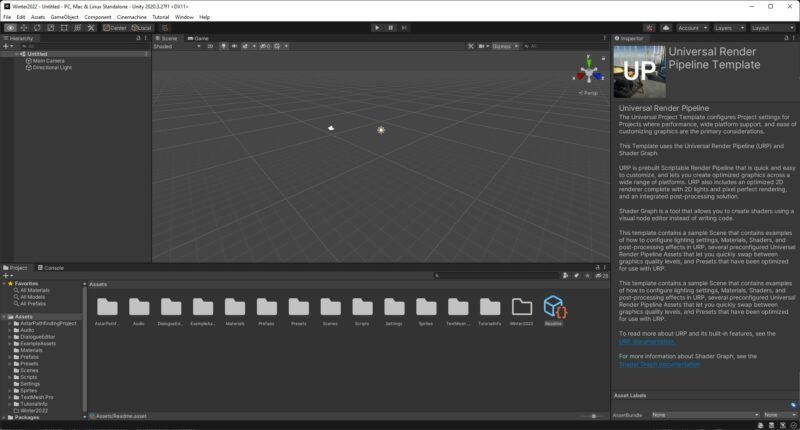
In this case, we’ll be analyzing a simple roleplaying game. Golem Village was created for a game jam event (where the idea is to work with a theme and build a functional game within a short amount of time, whether days, weeks, or whatever). We’ll be looking at common functionality such as interface design, interactions, and movement and how everything comes together to make a game work.
The project uses the universal render pipeline sample as its base, as shown here:
Now you may be wondering where the menu is – however, it doesn’t actually exist! Instead, it is created at runtime using objects that are defined in the scene hierarchy:
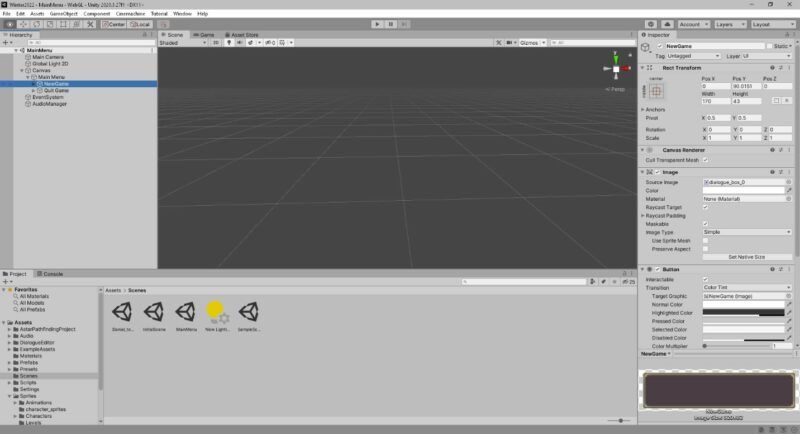
In this example, the game defines a button that is created at runtime. The button is given these properties and functions:
- An image object. This is given the source image called dialogue_box_0 with no material attached.
- The button definition. This is set to interactable so that we can actually start the game, with a highlighted color set to match the button image. The handler for its On Click event is UIManager.PlayGame().
- A Default UI Material object. This is set to the default shader and is hard coded (so we can’t change it).
The following code documents the UIManager.PlayGame() function, which controls the creation of a new game session:
public void PlayGame()
{
SceneManager.LoadScene(SceneManager.GetActiveScene().buildIndex + 1);
}
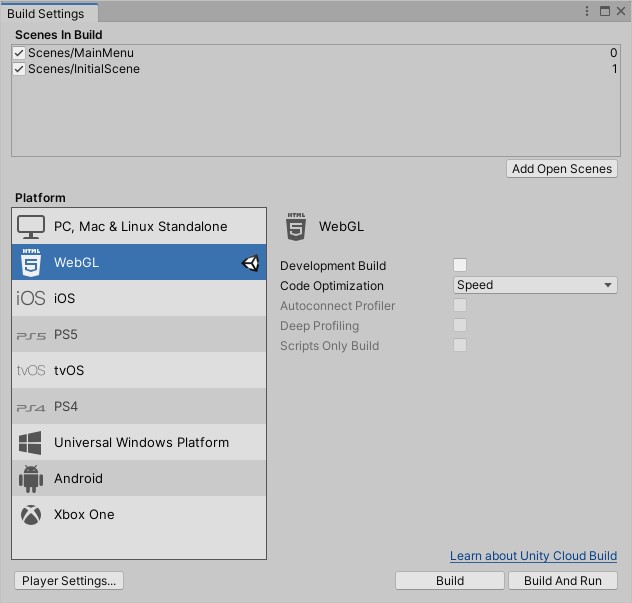
In this code, the game retrieves the active scene (which is the menu scene) and adds one to the build index of the scene list (which is 0, or a step less than 1, as is the practice in computer programming). The build index is defined based on the positioning of scenes in the build settings like this:
Finally, this is encased in a LoadScene call, which loads the requested scene and starts the actual game session.
Likewise, the Quit Game button closes the game and returns you to your desktop. Since the properties are set the same way as the New Game button and the function is rather self-explanatory, there is no real requirement to focus on its script code; however, to give an idea of how the menu works (and to preview other functions as they are documented) the entire UIManager is provided below:
using System.Collections;
using System.Collections.Generic;
using UnityEngine.SceneManagement;
using UnityEngine;
using UnityEngine.UI;
public class UIManager : MonoBehaviour
{
[SerializeField]
private GameObject _OnPlayerDeath_Panel;
[SerializeField]
private GameObject _Rety_Button;
[SerializeField]
private GameObject _Rety_from_checkpoint_Button;
[SerializeField]
private GameObject _gameover_text;
private bool temp = true;
private bool mfaded = false;
public float duration = 20f;
[SerializeField]
private float textFlickerSpeed = 0.4f;
public void PlayGame()
{
SceneManager.LoadScene(SceneManager.GetActiveScene().buildIndex + 1);
}
public void Quit()
{
#if UNITY_EDITOR
UnityEditor.EditorApplication.isPlaying = false;
#endif
print(“Closing Scene”);
Application.Quit();
}
public void LoadLevel(string name)
{
Time.timeScale = 1f;
SceneManager.LoadScene(name);
}
public void MainMenu()
{
Time.timeScale = 1f;
SceneManager.LoadScene(0);
}
public void NextLevel()
{
}
}
The hash-tagged definition in this code checks for a playtest within the Unity editor and ends the playtest by setting its value to false. The MainMenu function reverts to scene 0 (again, numeric programming references are one less than the actual position, so 1 is 0, 2 is 1, etc.), and this effectively restarts the entire game session.
LoadLevel loads a scene based on its name, while Quit basically explains itself. NextLevel is not used in our example, so it is completely empty.
Now, we’ll take a look at the game scene. This one is a lot more obvious in its structure, as the visual elements are far more visible in the editor:
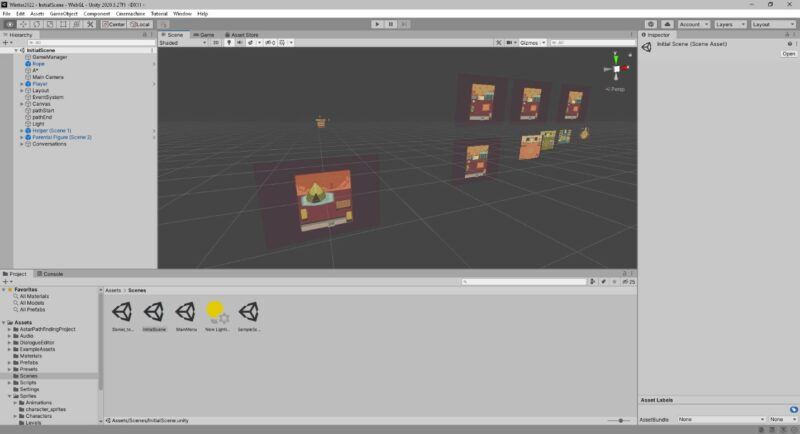
Each individual image is a different area in this scene. The section with the tent is where the game begins, and the rest are individual rooms. In the distance are the images that represent hallways. Note the presence of a game manager object in the hierarchy as follows:
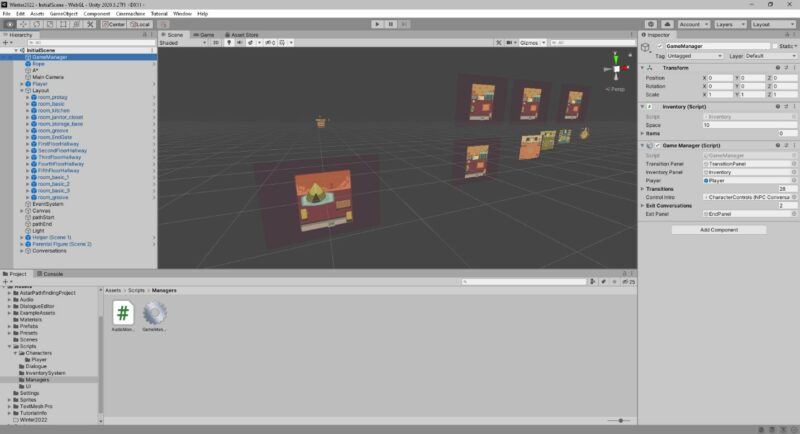
This object is what makes the whole thing work. The transition panel is set to an equally-named object in the scene’s canvas with the following properties:
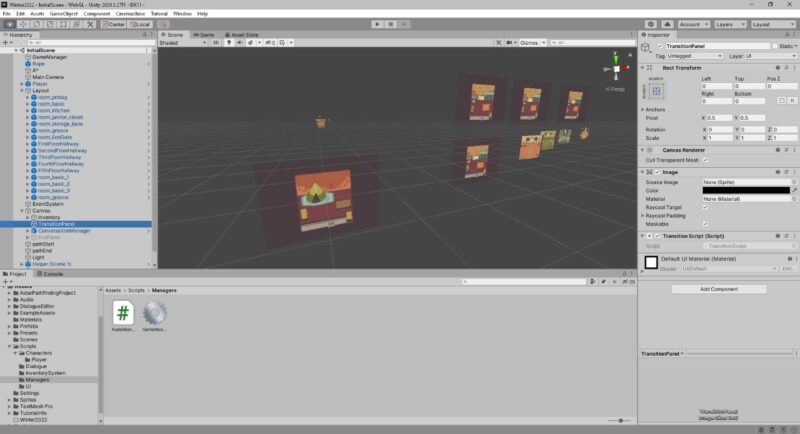
- A rect transform that pins the transition panel to point 0,0 (x0, y0 in 2D coordinates) with a Z position of 0. The right and bottom are also set to 0, with the scale set to 1 for X, Y, and Z.
- A canvas renderer with a transparent mesh cull activated.
- A blank image (with no attachments) and black fill color. It is set as maskable and as a raycast target.
- A connected C# script called TransitionScript.
- A material called Default UI Material.
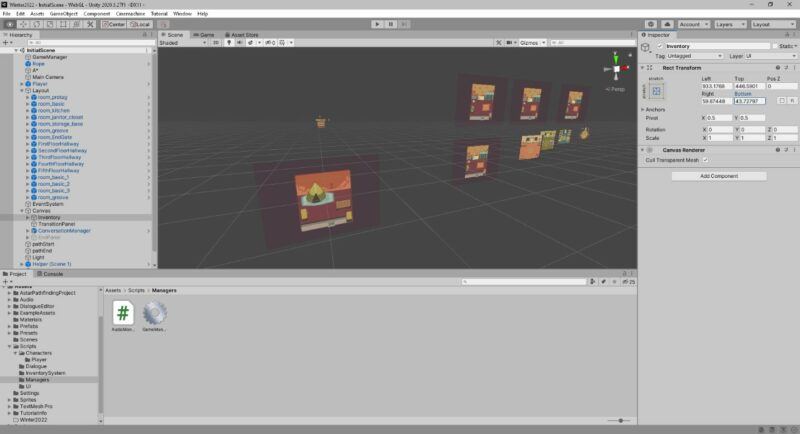
The inventory panel on the game manager is also set to an equally-named object, which also has a canvas renderer with a transparent mesh cull activated. However, its only other configuration is a rect transform that positions the object based on the X/Y coordinates of 933.1768 and 446.5901, respectively.
Right and bottom are also given numeric values this time, in this case being a respective 59.87448 and 43.72797. There is also a 0.5 pivot on both X and Y; however, everything else is the same.
The player is the only object linked to the game manager that is not connected directly to the canvas and has all kinds of characteristics:
- A sprite render that defines the sprite sheet for the player character, set to the protagonist sprite. It doesn’t have a mask interaction configured, its draw mode is simple, and the sort point is at the center of the sprite sheet.
- A transform with vales of -0.131, -0.011, and 0 for the respective X, Y, and Z coordinates. Rotation is not used (so all three values are 0), and the scaling is 0.25 for both X and Y.
- A 2D character controller script with a 0.4 base speed, the game manager set to its equally-named object, and an animator for the player, which is defined later in the configuration with a defined PlayerAnim controller, a cylinderAvatar, culling set to animate under any condition, normal updating and no root motion.
- A 2D rigid body with simulation turned on, dynamic body type, mass of 1, .05 angular drag, 0 linear drag, 0 gravity scale, discrete collisions, a sleep mode that starts with the player being awake and no interpolation.
- A 2D capsule collider with respective X and Y of -0.003126729 and -0.03893022 for the offset and 0.08518908 and 0.2099844 for the size with a vertical direction.
In terms of scripting, the game manager reads like this:
using System.Collections;
using System.Collections.Generic;
using UnityEngine;
using UnityEngine.UI;
using TMPro;
using DialogueEditor;
[System.Serializable]
public class TransitionMapping
{
public GameObject entryRoom;
public BoxCollider2D exitCollider;
public Transform entryPoint;
}
public class GameManager : MonoBehaviour
{
[SerializeField]
private GameObject transitionPanel;
public GameObject InventoryPanel;
public GameObject player;
[SerializeField]
private TransitionMapping[] Transitions;
[SerializeField]
private NPCConversation controlIntro;
[SerializeField]
private NPCConversation[] exitConversations;
[SerializeField]
private GameObject exitPanel;
const int exitConversationIndex = 0;
const int ropeMissingConversationIndex = 1;
private Dictionary<Collider2D, TransitionMapping> TransitionMap;
private TransitionScript transition;
private AudioManager audioManager;
// Start is called before the first frame update
void Start()
{
TransitionMap = new Dictionary<Collider2D, TransitionMapping>();
transition = transitionPanel.GetComponent<TransitionScript>();
InventoryPanel.SetActive(false);
audioManager = AudioManager.instance;
if(audioManager == null)
{
Debug.LogError(“audioManager is null“);
}
for(int i = 0; i < Transitions.Length; i++)
{
TransitionMap.Add(Transitions[i].exitCollider, Transitions[I]);
}
ConversationManager.Instance.StartConversation(controlIntro);
}
// Update is called once per frame
void Update()
{
if (Input.GetKeyDown(“i”))
{
InventoryPanel.SetActive(!InventoryPanel.activeSelf);
}
if(ConversationManager.Instance != null && ConversationManager.Instance.IsConversationActive)
{
if (Input.GetKeyDown(KeyCode.Return))
{
ConversationManager.Instance.PressSelectedOption();
}
}
}
public void SwitchRoom(Collider2D door)
{
if(TransitionMap.ContainsKey(door))
{
ChangeRoom(TransitionMap[door]);
}
}
public void ChangeRoom(TransitionMapping t)
{
transition.StartTransition();
Vector2 startPosition = t.entryPoint.position;
player.transform.position = new Vector3(startPosition.x, startPosition.y, player.transform.position.z);
Camera.main.transform.position = new Vector3(startPosition.x, startPosition.y, Camera.main.transform.position.z);
Camera.main.GetComponent<cameraMovement>().UpdateBounds(t.entryRoom.transform.Find(“boundaries”).gameObject.GetComponent<BoxCollider2D>());
}
public void TriggerExitDialog()
{
bool hasRope = Inventory.instance.CheckIfRopeExists();
if (hasRope)
{
ConversationManager.Instance.StartConversation(exitConversations[exitConversationIndex]);
}
else
{
ConversationManager.Instance.StartConversation(exitConversations[ropeMissingConversationIndex]);
}
}
public void TriggerGameExit()
{
CharacterController2D playerController = GameObject.Find(“Player”).GetComponent<CharacterController2D>();
playerController.StopMovement();
playerController.enabled = false;
ConversationManager.Instance.EndConversation();
exitPanel.SetActive(true);
StartCoroutine(FadeInExit());
}
IEnumerator FadeInExit()
{
Image image = exitPanel.GetComponent<Image>();
float time = 2f;
for (float i = 0; i <= time; i += Time.deltaTime)
{
float normalizedVal = i / time;
// set color with i as alpha
image.color = new Color(normalizedVal, normalizedVal, normalizedVal, normalizedVal);
yield return null;
}
yield return new WaitForSeconds(2f);
Transform tf = exitPanel.transform.Find(“EndText”);
tf.gameObject.SetActive(true);
TextMeshProUGUI text = tf.GetComponent<TextMeshProUGUI>();
Color textColor = text.color;
time = 2f;
for (float i = 0; i <= time; i += Time.deltaTime)
{
float normalizedVal = i / time;
// set color with i as alpha
text.color = new Color(textColor.r, textColor.g,textColor.b, normalizedVal);
yield return null;
}
}
}
As an aside, the SerializeField definitions are the portions of the script that define where the settings for the player and related object that we saw earlier are defined.
The script also has some game logic that is triggered based on whether or not the player has acquired a specific item, in this case, a rope that is used at the village exit to climb down into the hands left behind by a lost golem guardian (or at least that’s the plan for the game’s follow-up project).
The TriggerExitDialog function checks if the rope is in the player’s possession so that it can be dealt with and also determines which message to use. Having the rope triggers the exitConversationIndex relative to that condition, while not having the rope triggers the conversation linked to the ropeMissingConversationIndex.
TriggerGameExit has a few other script calls that will show up periodically while working with scripts in Unity. In particular, the playerController is linked to the character controller that we saw earlier by using the following mechanism, which has been repeated below:
public void TriggerGameExit()
{
CharacterController2D playerController = GameObject.Find(“Player”).GetComponent<CharacterController2D>();
playerController.StopMovement();
playerController.enabled = false;
ConversationManager.Instance.EndConversation();
exitPanel.SetActive(true);
StartCoroutine(FadeInExit());
}
In this example, the script locates the definitions for character control (which are considered to be functional components, hence the GetComponent call which retrieves this information. GameObject.Find(“Player”) does the work of tracing out the player object in the hierarchy so that the associated character controller can be detected.
The script code then stops player movement, turns off the controller, ends all conversations, activates the exit panel, and then runs a Coroutine to fade in the exit effect. Here’s another look at that portion of the script:
IEnumerator FadeInExit()
{
Image image = exitPanel.GetComponent<Image>();
float time = 2f;
for (float i = 0; i <= time; i += Time.deltaTime)
{
float normalizedVal = i / time;
// set color with i as alpha
image.color = new Color(normalizedVal, normalizedVal, normalizedVal, normalizedVal);
yield return null;
}
yield return new WaitForSeconds(2f);
Transform tf = exitPanel.transform.Find(“EndText”);
tf.gameObject.SetActive(true);
TextMeshProUGUI text = tf.GetComponent<TextMeshProUGUI>();
Color textColor = text.color;
time = 2f;
for (float i = 0; i <= time; i += Time.deltaTime)
{
float normalizedVal = i / time;
// set color with i as alpha
text.color = new Color(textColor.r, textColor.g,textColor.b, normalizedVal);
yield return null;
}
}
Here, the exitPanel’s image is read into an image variable specific to the script, a floating-point value of 2f is set as the time checker, which is then counted until another floating-point value is equal to the system’s delta time, and a third floating-point value is set based on the second value divided by the time value.
The image color is then set based on the third value, followed by a yield return of a null value (meaning nothing is necessary for the yield). Once the counting is complete, a second yield definition is used to wait based on a value of 2f (and this time, a return value for the yield is required, so a fresh definition for the WaitForSeconds enumeration with a 2f delay value is used to pause the script.
From here, a transform definition is used to find the transform configuration for the end text in the exit panel. This is then set to active status, and a text mesh is located within the transform definition, and its color is saved to a color definition. Finally, the counting procedure from earlier is repeated to close out the process.
Finally, there’s the matter of collision detection. That is to say, we need to define areas where the player cannot go (such as where objects such as walls, tables, and other furniture are located or where a non-playable character (NPC) is standing).
For this, we’ll forego the scripting entirely and use a box collider to do the work of intercepting the player’s position and setting the requisite boundaries.
Returning to the initial play scene profile from earlier, we can expand any one of the room sprites to reveal the objects within, which, in this case, are all region-defined with transforms and box colliders as their sole components (with the exception of the floor, which uses an edge collider):

In this example, the box collider sets an inaccessible area of the player’s personal quarters to block off the table. The offset for this collider is an X/Y of 0.04661093 and -0.02276307. For the size, we can either enter these numbers manually or use the Edit Collider function to activate sizing handles for the collider so that we can fine-tune the boundaries while visualizing the changes:
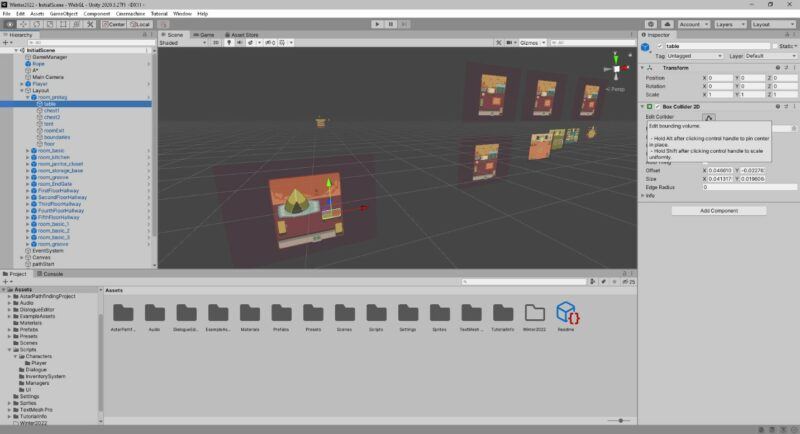

In either case, the resulting size is an X/Y of 0.04131757 and 0.01960642. Notice also that the images themselves are rather small; this allows for them to be more easily positioned in the editor’s canvas. However, when the game is started, these images are automatically scaled up to fit the play area like so:
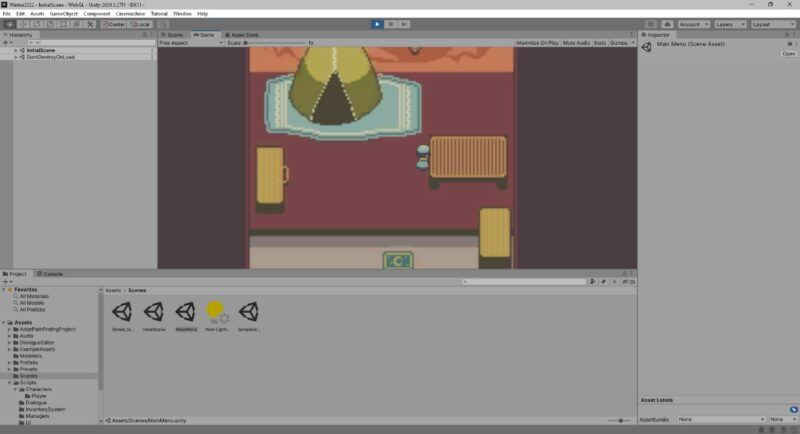
The game is also processing the table collider that we discussed earlier by preventing our movement into its area despite the fact that we’re pressing into its location.
Things to Watch Out For
Of course, as with any language (spoken, computed, etc.), there are syntax conditions in the grammar structure that you have to be aware of while making sure that you follow them to the literal (read: exactly as they are stated). The following is a list of common issues with C# that can trip up even the most casual of first-time programmers:
-
And/or evaluations
In C#, statements that have to be the same across the board or can be one of several conditions (meaning either/or) have to use two of the same symbol. For an and condition, it’s double ampersands (&&), while an either/or situation uses two vertical bars (||).
-
Backslash duplicity
Backslash marks (\) are used primarily as an escape mechanism for certain types of codes whenever you’re writing out a string of text. For example, if you want a line break you would write the value as something like “what the\n heck happened?”
Because of this, if you want to have a backslash in the text you’ll have to double it as you would in the and/or evaluations, meaning that “C:\Users\Me” becomes “C:\\Users\\Me”.
-
Case of confusion
C# treats its definitions as two if you capitalize one and not the other, so if you define a bool called flipFlop, it’s not the same as another bool named FlipFlop.
In fact, this applies to the entire definition, so flipflop in all lowercase doesn’t work either, as the only thing that does is to create a third definition with the same set of letters.
Likewise, variable definitions such as new, bool, int, sting, and even a generic var are all lowercase (although other kinds of definitions such as functions and properties are a mix of upper and lower cases such as ToString, StartCoroutine, WaitForSeconds, etc.)
-
No space at the inn
One other gotcha with definitions is a space! Heavens! Definitions cannot contain spaces!
Open/shut containers and doorways: Any time you write code for an evaluation, it has to be typed out within some kind of container delimiter. For an if switch, while, or even the whole function, the variables go within parenthesis (()) while the logic goes within braces ({}).
Furthermore, every command within those containers must also end with a semicolon (;) so that the system knows when one job ends and the next one begins.
-
Definition access
Any time you use a function, it has to end with either an empty parenthesis or a container of values within the parenthesis (depending on whether or not the function requires that you include variables in the function call).
Strings of text vs. numeric integers: If you’re directly using an integer in the context of a string of text, you can’t expect to do so automatically. Instead, you have to read it as a separate string of text, so the int definition elitist = 1337; must be read as elitist.ToString(); in order to use it as text.
Likewise, converting numbers in text requires that it be passed down to the numerical portion which is written as elitist = int.Parse(“1337”); for the purpose of this job. Note also that because numbers are always considered to be some sort of integer value, they cannot be used as a definition name such as a function, variable, or even an object name.
In addition to this general advice for C#, there is one other thing that can trip up basically anyone in the context of Unity: if you change the name of a script file, you must also change the name of the script’s MonoBehavior line to be the same as the new filename, and then change any objects which reference that script to use the new name.
Helpful Resources
Finally, here are some resources and other provisions if you need more than what is provided in this guide:
Unity Asset Store: buy and download assets that can be used in your game.
Unity Forums: discuss matters related to the Unity framework.
Stack Overflow: general-purpose programmer community answer board.
ID@Xbox: membership application for self-publishing your game to Xbox and Windows.
PlayStation Partners: same as ID@Xbox but for PlayStation.
Nintendo Developer Portal: same as the previous two but for Switch.
Be the first to comment